Technical Tidbits
For Glassic / Replicar Model A Ford
Replicas
| The information below was collected over time and may
prove helpful to current owners. No claim is made for
accuracy, so this information should be used with
caution. It is meant to give "clues" and
"insight" to the restorer. Browse these random,
unsorted items, or use "Search" on your browser
to find a topic of interest. New items will be added to
the TOP of this page with the date of listing. Undated
items were listed in October, 2001 See also TIPS FROM OWNERS for other miscellaneous technical issues and solutions. |
- upgrading to an AOD Transmission
(Automatic Overdrive)
In August, 2009, some info on an AOD swap
from car 1148, a 1974 Roadster.
see the
album and some comments in Car Tales --
In Feb, 2008, I found this link on the Mustang
II Yahoo group to a page by a guy who had made the swap.
http://members.tripod.com/cyberbudda/aod_swap_with_pictures.htm
The cars reported below all ALSO converted to the 351 engine. Not clear whether having the correct flexplate relates to the 351, the AOD transmission or both. What IS clear is that the wrong flexplate can ruin your engine.
The Ford engine Glassics and Replicars (except for a very few stick-shift cars) all came with the C-4 transmission. Several people have wanted to upgrade to the overdrive transmission. In 2008, I realized that info on this swap was not well documented and was not even in the index, so here is a start:
From this webpage in 2004 or so: http://www.glassicannex.org/1106/1106.htm
This car has a highly modified 352 (I assume that should be 351) engine and an AOD (automatic overdrive) transmission. JJ warned that you need to replace something (flexplate?) when converting from the C-4 transmission to the AOD (not the EAOD, which is the electronic version that requires a computer etc). JJ said there is a kit that goes on the throttle linkage, and you manually adjust the cable so that the overdrive kicks in at a speed you select. (by trial and error) The flexplate or whatever that engine part is, must be replaced or the engine will be ruined (it MAY be that a C-6 flexplate will also work). JJ learned that the hard way.
Then, in 2007 and 2008 cars 1148 and 1279 got the conversion
From car 1148 after seeing the above info:
I am not exactly sure what the problem was for him but here is a guess.. you can not use the flex plate from the original 302 on the 351w engine.. Catastrophic failure will result as it has to be a certain weight to balance the motor properly. In the case of mine it is a 302 stroked to 331 and a 28oz flex plate comes with the motor for use with the AOD trans.. If anyone else has any ideas please let me know. I am still trying to figure out the best way to re-do the a-brake system.. Also thinking out the best way to do the trans shifter.. I may try a electronic push button shifting system..From car 1148, in the fall of 2009, added a floor shifter on his AOD, and ended up having to re-do the transmission hump, to raise the shifter to a better position. Here are his comments, and some good pics on his album page:
I took the body back off -- we had to raise the center hump to accommodate all the new stuff. We added a 32 nostalgia shifter and that required more room. I took to heart the complaints from other owners the shifter sat too low, so this raised it about 6 inches.We added a metal preformed hump from a 32 ford preformed piece. We then re-fiber glassed the entire center hump and flattened out the center on the edges to create more foot room. We polished off the underside with truck bed liner finish.
Any ideas as to other things any owners may have done would be greatly appreciated. So far lots of mistakes and re-doing things, part of the learning curve. However on most of this stuff we are becoming experts. If any other owners need help or have questions just ask me I am happy to relay everything I have learned, and mistakes, things not to do.. -- photos in the album..
From car 1279 while re-doing his car:
To connect the AOD (automatic overdrive) transmission, he had to move the transmission mounting brackets back about 2 inches. In Daves case he had to have 1 ½ inches cut off the drive shaft. He is using a different rear end, but using the original rear end might require no shortening. Daves rear end, with 11 inch disks came out of a 1995 Mustang. He took the axle to an "axle guy" who cut it and welded on the correct end.Daves new axle has gearing of 3.08 Our discussion of rear end gear ratios was confusing so we need a clarification. Dave said his different ratio was ok since he had the aod transmission. I will try to find an article I had read about gear ratios an post it.
NOTE: as of this posting 1/31//08, Dave had not completed car 1279 or had it on the road. So how this all works remains to be seen.
AOD and rear end gear ratio
Received 3/2008 from Alatorre@charter.net the California owner of car 1148, a 1974 RoadsterIt should be noted when changing to an AOD trans the rear gear ratio is crucial. The factors are gear ratio and tire size, as well since most AOD transmissions have a .66 to .70 overdrive.. A 24 inch tall tire with a 3.00 gear set on the ford 8 inch at 2000 RPM is about 68 miles per hour. To really get the gear ratio right will result in the overdrive coming in at 62 MPH at 1800 to 1900 RPM. There is a formula to get the exact setup.
As to the Ford 8 inch rear the gears available are 3.00 then 3.25 , 3.55 , 3.80 , 4.11 and 4.62 there are a couple of more however not relative here. Overall tire diameter is also a big factor. There is a calculator to help you at http://www.dennysdriveshaft.com/html/potential_speed_calculator.html
Just fill in your rear end gear the RPM you want to be at and Tire diameter hit calculate.. Then adjust the gear ratio accordingly to find what works best. PS the overdrive value I use is .70 but ask the guy who builds your trans as to the exact gear set he uses. Enter it as a decimal point value.. I hope this helps... My car is still under construction.. thanks
Limited leg room in Roadsters
After not having heard of this since starting the Annex
website, it has come up TWICE in late 2007 and bears mention. Thanks
to the two owners for sharing this info.
Two people are not keeping their Roadsters because of a lack of legroom. Both are large owners, 250 and 300 pounds, but both are also 6' 4" tall. When the Glassics were built, many of the original space problems in real Model A's (And Shay replicas for that matter) were addressed. The wider doors and tilt steering wheel helped. The problem, however is in the distance for people with long legs. One owner has a 36 inch inseam and sports size 14 shoes.
His description of fitting in his Roadster was humorous, in a scary sort of way. The floor shifter of the earlier models added to the issue. He almost had to change gears in order to move his foot from the gas to the brake, since he had to wind his longer leg around the shifter just to get to the pedals.
Having sat in a Roadster myself (5'10" and a well-fed 255 pounds) I did not notice cramping - other than the usual narrowness of the cars, so the problem is more one of HEIGHT and leg length than a big gut.
If you are tall and large, and are considering buying a Glassic, consider a Phaeton. In that way you can use the back seat floor space to scoot further back and also recline your seat further. With a Roadster, there is no expansion space. Remember, both people with issues are 6'4", so if you are almost that tall, you might want to try before you buy.
Oil Filters
The following fit my 1978 Mustang 302 engine: Purolator L10017, also AC Delco PF2217, or high efficiency:: PFL1A, or OEM style: PF2 or SPF2 (all AC Delco numbers.) Penske PN43 fits and is a bit taller than the Purolator. Advance Auto Parts AA16 is the shorter style. As far as I know both fit, but the shorter one (about 1/2 inch shorter) is easier to fit into the tight quarters.
Dave (Car 1239 and 1279, both 1978s,) suggests the HP3 from Fram. Not as easy to find, and more expensive, but this high performance filter has a valve in it that keeps the oil pressure up, so your oil is under pressure when you first start the car.
TOPS AND SIDE CURTAINS
This item prepared by the Annexmaster in 9/2006 in response to several inquiries over the years.
Convertible tops and side curtains are NOT available anywhere as a ready-made item. They have to be hand-made for your vehicle. Except for costing more than an "out of the box" top, it is not difficult to get these made.
The tops on all years of Glassic do NOT match real Model A's. Remember, these were built BASED on the look of the Model A, but with changes for comfort, so the size of the top does not relate to the Model A. There were changes in Glassics when they became Replicars in 1976, so later tops will not match the earlier Glassics, but within general groups, the tops could be swapped with another car.
Tops, and side curtains can be hand made by most convertible top shops. If you have it, it is important that you keep your old top and curtains to show them as a pattern. It is also helpful to get several estimates, since prices vary widely from shop to shop. Places that do BOAT tops and upholstery can also build one in many cases. There are pictures on the Annex website of top frames, tops, and side curtains that you can print out and take to your dealer as reference materials.
On side curtains: I have observed several types of these, so if you have a preference, tell your vendor. I noticed that some have a WIDE fabric border around each window, yet others are mostly clear plastic. There appears to be some flexibility in how these are made.
From the builder in Sept. 2004 -- in response to a question about which gas pedal was used in a 1972 Glassic
The gas pedal should have been out of a Bronco or a Maverick or a Mustang about that time... The brake pedal hanger and pedal assembly was also from a one of them and the emergency-brake was from whatever we could find...There are lots of hot rod after market options available today that would work that weren't available in '72.. so I guess the solution would be easier to solve today from available parts ...
Overheating --
this info was added by the Annexmaster on 4/19/04. I feel sure that I already had posted this on the website, since this question has come up fairly often. I haven't been able to find it, so here is what Joel, and others, had to say on the topic.
First, the car may not be overheating. The gauges are known to become inaccurate. There, supposedly is a way for a mechanic to test the actual temperature in the radiator. I believe it is something that screws onto the radiator cap. The gauge (on my 1978, anyhow) has marks that don't match the numbers. The indicator might be on 200 degrees, but the mark is further down on the gauge, so when the indicator is by the number 200, it is really not at the hash-mark for 200 degrees. Going to 100% antifreeze can help. Also, possibly a flex-fan. 3-core radiators are a possible help in persistent cases. Joel had observed most overheating issues with parade speeds, with the AC running at full-blast. Someone has also suggested a high-output water pump as a replacement. Someone suggested an electric fan on the radiator. Also see this owner's shroud solution.
Some Ford water pumps fit ok, but turn in the wrong direction. water pumps -- read about it from the owner of a 1974. (Multiple topics on that webpage). Also, look at possible corrosion in your old pump.
A letter received 10/04 from Jack Moore (the unofficial "Glassic Mayor of West Virginia") added these observations: Mr. Salley, car 703, put in a Maverick cross flow radiator and a different water pump. His lower hose comes from left of the radiator, compared to the right on a Mustang radiator.
Jack Moore also said that he put an 8 x 18 inch piece of aluminum onto the radiator support above the top of his radiator - which would force the air through the radiator instead of over the top. He said it helped as he was having some overheating issues in heavy traffic. He is using a 3 core radiator.
RADIATOR REPLACEMENTS
Radiator replaced on a 1973 - 1974
info provided by Gary, car 581 in Nov. 2008
Radiator problems. I tried having mine cleaned and it ('73 Glassic) still ran hot. I replaced mine with a new one and all's well now.
The Modine part number is 2301 and the Ford part number is C4DE8005C. These fit 60 to 65 Falcon with the 289 CI and A/T and A/C and is the optional 3 row one.
This radiator was direct replacement in my car and yes there is a block off plate on the top off the radiator. I hope this helps someone solve their overheating problems as it did mine
**********************
OVERHEATING in a '73 Roadster -- Dale, car 700 offered THIS solution in 3/06
We also had problems with the engine overheating. That was solved by replacing the mustang radiator with a 1958-1960 T'Bird radiator, mounting it vertically, for space accommodation, instead of the horizontal way in the Birds.
********************
Radiator replaced on car 1178, a 1974, -- info received 11/2014
The radiator came from MUSCLE CAR RADIATORS 201/4X181/2X31/8 PART #205O30. We had to modify on the side by doing some grinding to lower it about 2in. We replace all the hoses but had to cut some off both ends of hoses.
********************
Car 689 (the Annexmaster's 1973 Phaeton) got an aluminum radiator in 2011 - which I did not report on the site. Anyhow, here is the page that I started back then but never put on the site. I will add to it when time permits, but it has the specs on the WRONG and then CORRECT radiators I got. Car 689 bling projects
Radiator replaced with a 4-core on a 1977
info provided by Louis, car 1121 in Dec. 2004
A replacement radiator for the later model Ford 302 Glassic/Replicars is a 1965-66 Mustang V-8. It is offered in two versions a right hand (passenger side) bottom outlet or a left hand (driver side) bottom outlet.
The core size (excluding upper and lower tanks and mounting flange) is approx 16 1/4" tall by 17" wide and 2" thick (3 row). The upper inlet on the right is 1 1/2" and the outlet on the bottom is 1 3/4".
A replacement may be purchased in either a 3 row (core) or 4. The 4 row is approx 1" thicker and will require modifications to the fan and/or fan spacer. Either radiator will bolt right in using existing brackets and holes. It may be necessary to drill 2 holes in the new flange to install the little L brackets used to mount the hood and radiator shell.
I used the 4 core and replaced the fan with an Imperial 17" flex fan part # 221617 $28.00 and Imperial 1 1/2" spacer part # 251508 $10.00. This fan/spacer combination was 1" thinner than the original and allowed for the proper clearance at the a/c compressor and the radiator. Both were purchased at Advance Auto Parts. The left hand (driver side) radiators are made for the 65-66 Mustangs with late model 302 engines and seem to only be available at Mustang specialty shops.S several I found are listed below:
mustangsplus.com phone 1 800 999 4289 3 row part # 5139 $195, 4 row part # 5140 $235 ( this is the one I used).NOTE BY THE ANNEXMASTER: 8/2005. Use caution ordering from these peoples' website. I called for measurements on a different radiator that was on their webpage. On the third try when someone finally answered the phone, they couldn't provide the info since they were out of the item, it was on backorder and they didn't know when they might get any. I suggest a phone order so you can be sure the item exists.
Also mustangdepot.com phone 702 262 0011, 3 row part # 259-3c $280. or 4 row part # 259-4c $300. All radiators I found had the filler cap more to the left than center but this caused no problems. Also you may wish to repaint it prior to installation as I noticed after mine was installed that the paint is very thin.
FOLLOW-UP INFO: I found this weekend where the Pitman arm (coming off the steering gear ) was rubbing the new radiator when I turned left. The tank on bottom of the 4 core is about 3/4" wider than the 3 core. I had to loosen, and shim the new radiator back about 1/4" on the bottom. By shimming the radiator back I mean that I moved it back 1/4" closer to the motor. Remember, my 1977 has the old steering gear box that is mounted at the very front of the left frame rail. The pitman arm comes off the steering gear sticking straight towards the rear of the car. All of this is in front of the radiator. With the wheels pointed straight ahead it did not hit, but as you turned the wheels to the right it moved over in front of the radiator and rubbed against it. It put a dent in the copper tank about a 1/4"deep about 3" long. I really can't believe it didn't leak. Anyway once I discovered it I didn't move the car until I fixed it. By putting washers between the radiator and mounting brackets it moved the radiator back just enough to clear.
Radiator replaced with Aluminum 1981
Info provided by Frank, car 1505, in Nov. 2008
My new aluminum radiator works just fine. About 12 to 15
degrees cooler. It could have been 1/2 inch taller (26") and still cleared all
of my original Glassic plumbing. 31 Model A 302/auto 25 1/2 inches by 17" wide.
$495 + shipping and handling from Portell Radiator Shop In DeSoto, MO.
Website:
www.portellradiator.com
PHOTOS of the Radiator and shroud
It looks like Frank did some trimming
to get a tight fit on that shroud. Frank sometimes pulls a trailer with his
Glassic
otherwise, his cooling setup seems to be way more than minimal to get the job
done.
Swapping to a 1932 grill shell or radiator shell
This issue came up in June, 2005. An owner liked the look of the 32 grill shell EXAMPLE PHOTOS and asked for info on a swap. This is the answer from Joel, the builder, who is pictured with his car and the earliest Glassic.
I've got a '32 shell on my car - 26" high with the shortened grill - www.tperformance.com ( pick the topic grill shells along the left side of the screen) Others have the parts, but the prices are pretty much the same from my searching... this should help get started... Over the years I have bought lots of parts from Mickey and have never been disappointed...
Mirrors
Mirrors - outside mirrors, or side mirrors. The following came to the Annex 4/14/04 from Louis, who owns a 1977.
The right or left hand rearview mirror may be purchased from Moss Motors phone 1 (800) 667-7872 or www.mossmotors.com The part number is 223-310 (see below) and sells for $29.95. I also gave this info to Dave, owner of car no 1112. He called me last night to say "thank you". He also got his mirror yesterday and was very happy with it. It is a identical replacement that will work on either side. The only difference is the nut that holds the mirror to the stem is slightly different from the original. I bought new chrome nuts at a local hardware store and changed mine out so they would be identical.
UPDATE IN NOV. 2018. GERRY, CAR 1402 REPORTS THAT THE LINK ABOVE (MOSSMOTORS) IS STILL GOOD AND THAT PART NUMBER IS STILL VALID. The mirror is for MGB, E-Type 1961-67, MGC
UPDATED INFO ON MIRRORS
Bob, the owner of car 819 supplied this info in May, 2005
Regarding mirrors for my 1973 #819 Glassic Roadster:This winter I had accidentally caught my driver side mirror and broke it. went to the website and found where someone found where to buy them MossMotors.com. The person at Moss Motors that assisted me informed me they do not carry Pt # 223-310 Late Lucas anymore. So I ordered the Lucas165-300 convex L/H and 165-210 Convex R/H. ( $44.15 delivery included) hope they work and will get back with you on how they work. Still want the originals though if anyone knows of another location. It sure is a challenge looking for parts. These mirrors come from England for Jag/MG/spitfires by the way.
![]()
Suggestion on the wiper blades. I used ANCO 9 inch blades part # 20-09 on my 1974. They are a perfect fit. They are available at most auto parts stores.
Windshield Wipers -- 3/2004. This information is preliminary, and I have not installed these to be sure that they work correctly. My 1978 has two different blade connectors on it. One is a bayonet type and the other is part of something with a blade hanging on by a thread.
I went to the local NAPA parts store and found out the following. The arms are available - the originals were Lucas wipers, and replacement arms come in two types. Both of these items are too long, but consist of a base part, and then an adjustable end. The part that adjusts is too long for our little windshields, but it looks like that end piece can be cut down so that it will adjust down to the small length that we need.
Depending on what type of connection will go on the blade that you find, you need a part # 60-750, $16.95 which has a couple of different fittings, a straight bayonet, and a curved bayonet. The NAPA store had no short blades that would fit on it.
BLADES -- My efforts to cut down larger, newer blades weren't successful. We need 8", 8 1/4" or maybe 8 1/2" blades, and they should be pretty thin fragile types. I have found several in hot rod and/or model A catalogs, but they all have the hook type connector. The arms that I got at NAPA (see above) were a bit too long, so I cut down the shaft end to match the original. The NAPA replacement arms don't seem to have a connector for the old clip type connector - and I haven't yet figured out how those clip type connectors work. Whatever was on my car (one wrist type connector and blade and one clip type) -- the clip type did not seem to be holding the blade on well at all. My goal is to find a pair of wiper blades with the wrist type connector.
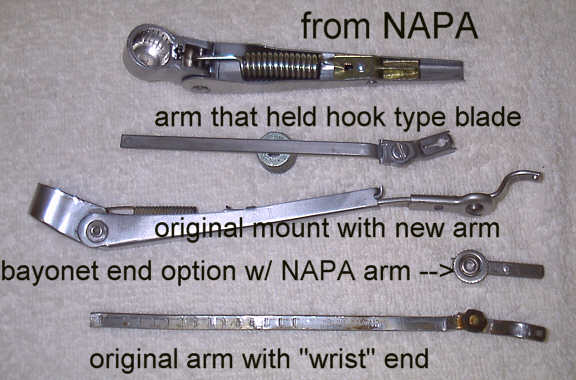
Napa part 60-750 looks most like the pic of the original mount with new arm. There is the part that mounts to the car, the adjustable rod, and two choices of "heads" -- neither of which were the "hook type" head. The new adjustable rod was a bit too long for our cars, so I hacked a bit off the end of it to shorten it.

A - above is what I assume to be the type end needed for the hook type blades that seem readily available. This setup on my car BARELY held the blade on the car.
![]() -- This blade
appears to fit "A" above. The pic came from
www.SnydersAntiqueAuto.com
where the blades are a modes $2.45 each. Others have these too.
-- This blade
appears to fit "A" above. The pic came from
www.SnydersAntiqueAuto.com
where the blades are a modes $2.45 each. Others have these too.
B - is the WRIST type connector. Seems fine IF we can find blades for this type of connector. Notice that I bent the rod a bit so the wiper would lay flatter against the windshield.

The blades shown above are 8 1/4 inch wrist action blades. The box is very old and these came from an eBay seller. I paid $16.50 for the pair including postage. The seller has relisted (as of 8/29//05) so he must have more of them. The picture above shows the wrist end on the new wiper arms I bought. The blade fit on fine. I searched for: wiper 8 on ebay to find these.

Above is a close up of the wrist type connectors on my 8 1/4 inch blades. As I said, the hook type blades are cheaper and easier to find - if you can make them stay on.
C - is another head option, the BAYONET, that can go in place of B. The notches around a circle are to hold it in place when you tighten it onto the arm.
My efforts to find a modern, easy to upgrade, solution for wipers were not too successful. When I buy the parts, I will include photos.
![]()
AIR CONDITIONER
- AIR CONDITIONING REFRIGERANT - FREON CHANGE.
In December, 2014, this info was received from Jack, the owner of car 1509 (at the time, the last Replicar known to have been manufactured)
|
I will pass on some info that I have learned. This was told to me by a gentleman that has been an auto A/C person for 40 plus years. I took mine to have it recharged, it was converted to 134R and charged the day before I got it and was not cold (not working properly) a month later. What I was told is that the older cars (before 1990) should NEVER be converted because the 134R runs at a higher pres & temp. On the older systems the drier has a low temp. plug, and with the 134R the temp went up & the plug let go. He also informed me that the condenser was put on upside down, and was to high on the rad. the fan was only pulling air thru the bottom of the condenser. The changes were made and changed back to R12 |
As an expert in absolutely NOTHING, the Annexmaster is surprised by the word NEVER in the analysis by Jack's mechanic. I think that anyone considering a change should consult the web and try to search Google for "converting r12 to r134a" and decide for themselves which information is most useful.
In February, 2004, the subject of upgrading the old Freon air conditioning system to 134a refrigerant came up. What issues, problems can we expect. Below are comments on the subject in response to a call for info.
From Don ( - a different Don, not the Annexmaster)
If you are changing over to R-134a you must replace all hoses and seals (O-rings, etc.) with new 'barrier-type' hoses and approved seals. R-134a will eat through the old style 0-rings. Also you must remove the oil from the compressor and replace it with the correct amount of synthetic oil (poe or pag). It will not allow mineral oil as used with R-12 to lubricate the compressor. There is a kit you can pick up at NAPA that should have a flush, o-rings, and synthetic oil to do that part of the job.
The amount of R-134a to put in the system after you are ready to recharge is about 85%-90% of the original charge. Start with the lower amount and add a bit more if you need to. You MUST weigh the charge in. NAPA should also have the hoses you will need. Most of the time, the expansion device does not need to be changed...sometimes it does. When you pick up the parts you need, ask them to look it up for you and see if the car you are working has a rec. for replacing the expansion device...I have also found that it is a good idea to replace the receiver/dryer whenever we have done one. There is always a few things trapped there that don't help the new system. (If the hoses are not what are known as "barrier-type" hoses, they must be replaced).
Mark, car 1290, a 1979 wrote:
I CHANGED OVER FROM FREON TO 134A AND IT WORKED GREAT I DID IT JUST BEFORE THE LAST REUNION (2003) AND HAVE HAD NO PROBLEMS. I DRAINED THE SYSTEM AND FLUSHED IT OUT PUT IN THE NEW 134 OIL AND 134A GAS AND THE NEW FITTINGS AND IT WAS DONE. EASY AS THAT
![]()
FRONT END Items
Front end -1967 Info received Feb., 2004 from
Bob -- fcbob@comcast.net
Scroll down a bit for front end info for 1978-81
Replicars
I'm redoing the front end on #270...after looking everywhere for parts etc I have come up with the following.. Front shackle bushings. NAPA P/N 274-8735...there are two to a box so 4 boxes are required to do the front spring shackles....fit perfect!
The rear attach point for the front spring uses a steel sleeved rubber bushing...I don't have a "vendor" P/N but the manufactures P/N stamped on my new one is.. SILENTBLOC 61257 221....one is required for each front spring.
Tie rod ends...I found the short end ...MOOG P/N ES262R...but not the long end. The P/N listed for the "long" end that I came up with was actually for a length similar to the "short" end....so of no use to those of us with the "short"/"long" rod set up....I did some further research and came up with shop in Denver that specializes in Scouts and makes a brand new tie rod set up from steering arm to steering arm with toe in adjusting provisions (turn buckle) using modern day tie rod ends. I'm going down to talk to them this Friday. If the set up looks like it will work (can't imagine why it wouldn't") I'll buy one....cost should be about $200...I'll let you know what I find out.
As I promised here is the info on a replacement set up for the tie rod assembly that I had made for #270
John Comer
Gryphin Automotive services
3760 Wheeling St #8
Denver CO 80239
303 364 4424
John is a one man outfit, a pleasure to deal with and a store house of Scout info. His specialty is dropping Chevy power plants into old Scouts! ! The unit he built for me is now in #270 and works fine. He uses readily available tie rod ends and threads them into a high strength steel tube with a 1/2 inch thick steel block welded to it with the tapered hole in it for the drag link connection. Stout is the word here...his Chevy equipped Scout customers use the same design and have had excellent results.... cost was 199.00 plus tax.
I noticed the difference immediately while driving. I guess we just get accustomed to a loose condition over time. Toe adjustment is accomplished by removing the tie rod end/ends and threading the end in/out. It's a little different than the sleeve type arrangement but it allows you to get toe on each side set just the way you want as opposed to lengthening/shortening the entire tie rod as you end up doing with the standard sleeve set up.
That's about it...he has the dimensions and everything so should anyone need one it should be pretty straight forward.
Replicars front end info 1978-81 models--
In response to a question about tie rods for a 1980 Replicar, I contacted Joel, the builder in 9/2007. Here are his comments:
On the latest models we had started to build our own front cross-members, so we widened it about 2" more than the stock Mustang II or Pinto... Then we went to the Fairmont rack & pinion steering gear which was wider than the Mustang by about 2 inches and fit the width of the body better.... So, give the Fairmont tie-rod ends a try... they just might be the answer...
![]()
Brakes
1967 -- Parts (wheel cylinders ,shoes etc) available at NAPA (car parts dealer) as of 2/2004
1973 -- Front brakes in '73 would have been E-100 Econoline - the rear brakes and master cylinder would have been Maverick V-8
1977 --(Reported by Louis, car 1121 in May, 2005) I went to an outside concert in the car last night and I noticed the brakes pulling badly to the left. When I got home I pulled off the rt front wheel and sure enough the wheel cylinder was leaking BADLY. I took it off last night and went in to look on the site for help. My 77 also used the wheel cylinder for a 1973 Ford Econoline 100 van Advance Auto part number w35326 for the right side wheel cylinder assembly. Also the front wheel (HUB) seal is part number 4148 and that is also for a 1973 Ford Econoline Van with drum brakes. I want to replace all 3 rubber brake hoses but they were not 73 van so I will have to work on that another time.
Another owner of a 1977 reported in 9/2006 that his car turned out to have 1974 Maverick brake parts.
1978 -- Rear brake shoes replaced without incident using 1978 Mustang. (Don)
1980 -- I just had new brakes put on my
1980 VIN #1480. The brake lines were from a 1978 Ford
Mustang Boss
The rubber line I replaced was to the front brakes and ran
from metal line that comes from the master cylinder
to the brake cylinder . The hose was about
15" long and had metal attachments at each end. (Dick)
Brake switch -- The brake switch on my 1978 went bad, and the replacement was not Mustang II. The switch that fit was bought at Discount Auto Parts and it was GPS # SLS62 or DAP Part DR493 -- it was a generic switch that fit Fords and several other cars. Under $2.50 in Nov. 2002 (Don)
.
![]()
Posted 1/7/04 from the original builder of the cars.
King Pins kingpins-- (in response to a question about a 1974 Roadster)
In 2014, while studying the subject, I
found out that it appears that kingpins are one word, not two, so I fixed it in
at least a couple of places so searches could find it.
Also, I am not sure that the Econoline kingpins are right and it may actually be
Ford truck kingpins from 67-74 1/2 ton, 67 - 70 3/4 ton 71 3/4 ton 72-74 3/4 ton
-- all supposedly the same size. Not confirmed yet by any Glassic owner.
------------- scroll down for 1977 pinion angle item
The ONLY king pins we ever used (other than the ones in the International Scout vehicles) were from the Econoline E-100... And the only problem that I know of with the king pin was the "keeper" in the axle that was supposed to secure the king pin in the axle and let the spindle do the turning... IF there is a king pin problem, I would suspect that the keeper loosened up or was not in the king pin "groove" and was not "bottomed out" properly which would have allowed the king pin to "work" in the axle.
If that happened it could have possibly enlarged the hole in the axle that it is supposed to be very tight....which would require the axle to be bored and a bushing installed to re-fit the pin tightly... Not an easy task ... I think I would try to replace the king pins and do something to secure the king pin in the axle using a grade 12 or a super hardened set screw with a lock nut and lock tite to maintain the king pin tightly in location and then re-bush the spindle, replace the thrust bearing, make sure the wheel bearings are well packed and properly adjusted, replace the steering stabilizer shock absorber as well as the front ride control shocks, make sure the steering gear doesn't have any excessive "play", and above all make certain the front tires are properly inflated... Then hang on and give-'er-hell... I am assuming the problem is a front end "shimmy" when you hit a bump just right, and just an overall "tighten everything up" and check the tire pressure may solve the problem, anyway....
PINION ANGLE on a 1977 input by Louis (car 1121) in 2005
Since getting our car it has always had a vibration when under acceleration. My brother and I were talking about it a week or so ago and he looked underneath and said the pinion angle was too great. I studied pinion angle on the computer and it was a little confusing with some people saying different things. I ended up ordering two sets of wedge shims one 4degee and one 6 degree. I also bought a neat little angle finder at home depot. I put the 6 in first and it changed the vibration from under acceleration to occur at a constant speed. I then pulled the drive shaft out and found slight slack in the front u-joint so I replaced both and put the 4 degree shims in to lessen the driveshaft angle. Long story short I hope I have all that right now. I have the pinion angle at 0 degrees.
JOEL, the car builder offered this in 2005:
as far as pinion angle is concerned, tell Lewis that I'd look in some shop manuals... Ford pick-up 1/2 ton - Datsun or Toyota with leaf springs & rear wheel drive (car or truck), etc. With me it was a trial and error thing... and expensive!!! Adjustable upper links (and 1/2 turn makes a difference... Also, the angle changes when the load is changed... full tank of gas and rear seat pasenger(s).. So you've got to establish a "happy medium"... I went with two bodies in the front seat (driver and passenger) and let the chips fall where they may when I'm "loaded"...
Soon thereafter, Louis emailed:
I am getting there however. Last weekend I removed the 6degree shims and went with 4 degrees. That seems to work pretty well, so I will leave it there.
![]()
SUBSTITUTE DOOR HANDLE -- in 2011, Bill, the owner of car 1008, a 1976-77 Replicar, reported the following:
CRUZED TO THE JUNK YARD-- ABOUT 1989 CHEVY VAN-- I CUT THE
SQUARE HOLE BIGGER AND RE-DRILLED THE OTHER MOUNTING.
IT WORKED GOOD (no picture was attached.)
******************
Below was posted by Don (the Annexmaster) 2/26/04
| The outside door handle button on my
1978 started to come out of its socket.
I could see the spring behind it. First I removed the
inside door handle I pulled the rubber escutcheon out of the way. The inside handle was held on with a pin that went through the shaft that protruded from inside the door. I poked the pin in on the side to the front of the car and it popped out the other side. I removed the door panel. The loose button is held on by a bolt on the inside that holds the button on and has a nut part way down it making the head end stick into the car side to make contact with the handle mechanism. If the bolt was, say 1 1/2 inches long, only 1/2 inch was screwed into the button, and the nut held it in place. That nut had become loose, and opening the door had caused the 1/2 inch part of the bolt to start coming out of the button. Eventually, the bolt would have come completely out and fallen inside the door panel. The button and spring then would have fallen off the car. --- Dave added a second lock nut to his bolt while he had his handle apart. Did you know that by clicking the inside door handle in the opposite way you can lock the outside of the door. That should keep really dumb people out of the car. The button came loose again after several months, so I re-tightened it and added a second nut an lock washer to hold it in place. I also got these pictures below this time.
|
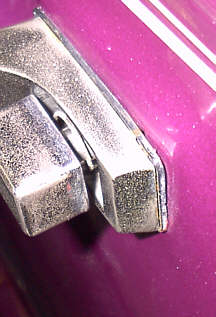 |

 button pushes the bolt which pushes the flat piece of metal in to unlatch the door. |
|
![]()
Origin of the V-8 Engines
Posted 4/16/03 from info received from the original builder of the cars.
Engine, Mustang: The "302" was used in lots of vehicles but the 65+ mustang got all the fame in the early days... Thus the "Mustang" engine description... The 302 "build" we used in production was from a Maverick with an engine "front" from a Bronco mixed with a Ford pick-up and early Mustang... We had to have parts that would work, fit and would "package" in a narrow, high engine room where Detroit had gone to a wide, low packaging situation... (The engine "front" consisted of the water pump & belt configuration - crank pulley, alternator & alternator bracket, air pump, etc., w/ an Eaton (fork lift) power steering pump and custom bracket/adjustment arm and using a '65 Mustang radiator...) All hooked to a standard 302 block using a Maverick calibration for the EPA pollution solution. Anyway, it all hooked together and worked or Ford Motor Company wouldn't have sold us the parts with a Ford Warranty....
![]()
GAS TANKS
(You may want to scan this whole section regardless
of your car year, since the info is somewhat mixed together)
Gas tanks (fuel tanks) were a problem from the get-go... Early four cylinder International Harvester - gas tanks were custom fabricated out of aluminum... They were each pressure tested before assembly in the vehicles (but some still had leaking problems) We used the International "Scout" 800A sending unit, wiring harness and gauge (King Sealy) to the best of my memory... (If one of these tanks gave trouble (leaking), the body had to be raised up off the chassis to remove the tank to make the repair or replacement. We tried cutting the back out of the tub (interior) to limited success... Or cutting a hole in the top above the sending unit if that was the problem... We used thin aluminum to cover the cut areas and caulking or dum-dum to seal the crack from any fumes or air leakage... None of this was very much fun and even with only a few "problems" it was a real pain in the neck... We went to a fiberglass tank somewhere in production, probably to meet the needs of the Roadster, because the aluminum tank would not work on that body design... Special chemical resistant resin was used to build the tanks and we had less trouble with them than we did with the aluminum tanks previously mentioned. We used a Stuart Warner sending unit instead of the Scout unit for these tanks but still retained the King Sealy gauge on the dash......
Leaking Gas Tank
This item was received in June, 2013 from Stan Prozny, owner of car #412 (an International-based Roadster).
I just wanted to follow up with the solution for my gas tank leak. I may have mentioned before that my mechanic advised that the sealants used in conjunction with the fiberglass gas tank are not tolerant of the 10% ethanol that is in the gas supply these days. In any case, my mechanic found a polystyrene material that is resistant to ethanol, alcohol, diesel fuel, gasoline, kerosene, etc. He managed to coat the entire interior of the tank with this product, but not without a good amount of grief.
Of course, the tank had to be removed from the car and he ended up separating the two halves. This was necessary to clean out the loose debris from the original sealant that was used back in 1971.
The bottom line is that the story had a happy ending and Im back enjoying my ride. My mechanic also mentioned to use only 91 octane gasoline. For some reason the oil companies do not put ethanol into the 91 octane mix.
I had not heard of this issue, but an internet check quickly found International Harvester fans who had encountered leaky gas tank issues. I have not verified the ethanol recommendation, but Google can likely provide some insight on that one.
*******************************
An owner of a 1974 reported that HIS gas tank
was from is from a Ford Bronco, 1966-76 vintage
Starting with the Ford (V-8) production units,
we used the gas tank from a Bronco or M-100 Ford mail truck with
the Ford sending unit probably for the Bronco. The
wiring harness was a custom harness built by a one man outfit in
Ft. Lauderdale (early models used "Brady Labels" for
wire identification) or in the later models they were built by an
outfit in Sarasota that manufactured marine harnesses for Correct
Craft, Chris Craft, etc... and they had stamped on ID numbers for
identification. Some of the gauges were
King Sealy (International Harvester), VDO Gauges, and there were a few Stuart Warner gauge sets
which we had a hard time calibrating to the Ford sending unit but
could still be in existence... My car has the VDO
Gauges gauge set and they are working fine.
(The temperature and oil pressure gauges are not as
accurate as I desire, so I am in the process of changing them out
to true mechanical gauges instead of the electric sending -
receiving units that have been in the car since 1980.)
As to the sending unit: if it is a 4 cylinder it is either an International Scout or (maybe) a Stuart Warner unit... If it is a Ford V-8 engine it would be a Ford Bronco (probably)... In either case, the solution would be to go to a parts store NAPA would be my choice and simply match it up with a replacement unit or a Ford dealership if it is a V-8...
------Item posted 11/2002. Information received from the recollections of the builder.
GAS TANKS -- 10/2006. John, car 1288, provided this link. He bought and installed a polyethylene gas tank 66 to70 Ford Bronco style to fit his 1978 phaeton. He added: "new gas tank went well -- only thing new tank did not have was a vent on top of tank so you need to use a vented fuel cap
http://www.autopn.com/store/pc/viewprd.asp?idProduct=7482
![]()
Owners manual. No owners manual or instruction booklet was ever produced for either the Glassics or Replicars.
![]()
Car # 101 (the first production car) Glassic did not have a plastic radiator shell, it had a fiberglass metallic, metal flake shell. – The first cars used the original International dashboard, International steering wheel. The headlights came through the fender instead of being on a bar –The early cars had ribs on the running boards and had a vacuum wiper motor on only one side. They had actual Model A replica wind-wing tips on them (the pieces that hold the side vent windows on)– and the interiors on those cars (seats) were all fiberglass.
![]()
Cowl lights
The cowl lights were dummies – the safety people wanted the turn signals ahead of, and below the headlights – None of the Glassic or Replicars were built with functional cowl lights. Some people have replaced them over the years, but originally, none were real.
![]()
When observing brochures by Glassic and Replicars – Mustang V-8 horsepower dropped over the years. The first Replicars put out were 237 hp dropping to 128 hp later. The horsepower dropped way down because of the pollution equipment added during that time.
![]()
Bumpers
The cars with bumpers that look like Model A bumpers were Model A replica bumpers. Some of them were the straight styled, 1930-31 style, but when the 1928-29 style (bent back near both ends) was more available from the supplier, they used those instead. The bumper "eggs" or medallions were also Model A replica parts.
![]()
Info from the builder of the Glassics
Engine swap. Regarding the International Model 80 or 800 cars. There was ample room in them for any small block V-8 engine to be installed, and the frames were certainly strong enough. Considerations in converting: you probably would want an automatic transmission, the motor mounts would have to be cut off and new ones fabricated, and the radiator would have to be re-worked, including adding a cooler for the transmission.
![]()
Info from the builder of the Glassics
All of the production V-8’s were build on special made frames (Only one V-8 prototype was made on an actual Scout frame, and that was a 289 cubic inch with a 4 speed transmission)
![]()
Info from the builder of the Glassics
Windshield stanchion supports had to be glued in with fiberglass, and a temporary jig was connected to the rear of the doors to get the correct height and angle of the stanchions during manufacture so that the top would fit right.
The windshield frame was special-made. The frame is a Reynolds Aluminum extrusion, that was bought to fabricate the windshield frames. The Glassic company had to BUY the mold for the extrusion, and then order the material. Once bought, the mold was available be used by anyone, so it may be possible to still get that material from Reynolds.
Windshield wipers.
With the introduction of the V-8, the cars started using Lucas brand electric wipers because the original Scouts, had a double-action fuel pump, which provided vacuum on both strokes. The Ford fuel pump did not have double action, so when you hit the gas, the windshield wiper would have stopped.
![]()
The company had built a number of cars with just an aoogah horn, and some state, perhaps Pennsylvania, complained that they were not "real" horns, so they built some with 2 regular horns, AND an aoogah horn. Those cars had a switch under the dash that allowed the driver to switch back and forth between the 2 horns.
![]()
The original wheel covers were pretty heavy duty, of good quality, with an eagle on them.
![]()
The Purolator filter (a canister on the driver’s side on the 1978) was an International Harvester part. It serves as a power steering fluid filter.
![]()
![]()
A 1931 stainless steel Model A reproduction radiator shell will fit if shortened top to bottom. A section would need to be cut out. There were 2 spot welds holding the bottom "smile" on the grill shell. So those spot welds had to be drilled out, in order to move the bottom up. Stainless steel is hard to cut – they had to use a band saw with a special blade and even the drill needed a special bit.
The SS shells would probably fit any year Glassic/Replicar with careful measurements and cutting
NOTE By 2005, I am hearing that this info is NOT correct, or may be correct only for older Glassics. The shape of the real Model A shell is different than a Glassic. Do not buy either a Stainless shell or the 32 Ford fiberglass shell without measuring first. Dave, car #1279, a 1978, found the shapes of both different than a Glassic and ended up having to have a lot of fiberglass shaping done on his 32 shell that he bought. -- Don, the Annexmaster.
2010 - The owner of car 341 has cut down a Model A grill shell and is fitting it to the car. They warn of the SHARP EDGES on the stainless when cut also, stainless is hard to cut. Pictures can be found at pics on restoration of car 341 Later on, the same owner reported"
Any owners thinking of converting their Glassic radiator shells to actual Ford ones will probably have to shave their hood back a bit at the top. The actual radiator's rear side is not flat but has a point to allow the hole in the top.
Not what I had really wanted to do --
![]()
Very few standard transmission Ford engine cars were built. Perhaps 12 or so of them. There was little space for the clutch and brake pedals and they were more expensive to build than the automatic transmission version.
![]()
The trunk was made from sheet metal, 9 or 11 gauge.
![]()
A skilled racing mechanic looked at a late model Replicar in the year 2001 and was generally complimentary of the mechanics. He liked the front end, but not the rear end. He suggested that what it needed for restoration was good, higher priced gas shock absorbers. The shocks would be from a Ford Fairmont.
He suggested using urethane instead of rubber bushings in the A frames and the links going back to the frame in the front end.
![]()
The production springs in a 1978 (or so) car should have been Pinto front springs. The lightest weight Pinto Springs available. The rear springs should have been Fairmont springs – the lightest ones available.
![]()
In fitting shock absorbers, the best technique is to take off an old shock and take it in to a parts store and compare it with a new one. Measure it extended and compressed against the new one. The parts shops have books that specify those measurements for new gas shocks. The objective here is NOT to get a stiff shock. You then match up the pressure in a gas shock with the percentage that a stock shock would have. That can be used as a starting point in adjusting the shocks to strike a balance between the softest ride and sloppy handling.
![]()
Info from the builder of the Glassics
WIRES
The wires under the hood are all red. The company wanted to use color coded wiring, but due to the limited production being custom fabricated by a company in Sarasota that did boat wiring, the cost would have been prohibitive. As with the boat technique, they used Brady labels – numbers wrapped around each end of a wire. In some cases, shrink tubing was then placed over the labels in boat wiring – also an added expense not used on Glassics since the numbers only had to be used one time to connect the wires. It may be helpful to know that the numbering of the wires followed a logical numerical sequence. Note: every wire with a #14 is a ground wire.
There is a front wiring harness for lights and horns. A hood wiring harness for the engine, then a rear harness for the gas tank and taillights, then 2 wiring harnesses under the dash. One had 2 multi-plugs that went through the firewall to the front lights and the other multi–plug to the rear. The engine running harness under the dash had one plug that went to the front. Some of those numbers may still be on the cars, especially under the dash.
![]()
Serial number. Serial numbers could be found on two places. First was the door sticker on the post of the driver’ door. The second was on the outside of the driver’s side front frame rail, right behind the front bumper mount. Look for a 4 digit number, stamped into the frame in characters about 5/8 of an inch high. Rust buildup over the years and a light stamping pressure makes these numbers very hard to see. The Internationals may have also had their own distinct frame numbers, which would not match the car number.
The Scouts had their own non-removable tag (it would be destroyed if removed) on the valve cover, and a stamp number in the block to identify the engine. Those did not match the serial number of the car.
![]()
Tire pressure on a late model Replicar: Front 23, and Rear 22. The Monroe Shock Absorber people had tested the car tires on a machine that had holes in the "ground" where a gauge probe could be inserted to observe the tire "footprint" They concluded that The pressure should be no more than 25 lbs, and suggested that the driver experiment under that. There is a fine line between comfort and a mushy ride which would cause flexing the sidewall. Some added tire pressure might be needed if the car is loaded up, such as in a parade with people in the back.
![]()
