| 9/7/04 I carried my
Glassic shell into Vintage Ford last Wednesday to see about buying new
wings and cap assembly, I laid it on the counter and the guy says,
28-29 model A, then after simply looking at it for a moment or two says,
"something is different about this radiator'. Then I told him what it
came off of. Plus the day before I took my extra 28 A shell off the wall,
carried it out to the Glassic, and also parked my Glassic next to my 31.
Then began to measure them both. The 31 was way too narrow, and for sure
way too tall. the 28 is almost a dead on fit. I will get you pictures of
my friend's Glassic that has the 28 fitted to it, and I am going to look
closely as to what they cut to make it fit.
Dairy entry for car # 982. I took the windshield off and sanded
and buffed it out last week. Looks just like chrome. I started to buff
the wiper motors but thought better knowing it would take hours to get
into the small places.
I removed the mirrors for buffing out. I noted that the mirrors
were made by Lucas, possible for a MG, Jag or some other English model. I
finished installing a new four row radiator. Had to remove the
small spacer from behind the fan to move back the fan. The new four row
was about 1.5 inches thicker. This four row should never have a problem
keeping this thing cool. The radiator was just a straight fit, the basic
Mustang radiator. (more on this subject further
down - ed.)
Replace the top and bottom radiator hoses, they were for a 69
Mustang, had to cut some off both hoses to shorten them up. The new
water pump was also for a 69 Mustang. While cleaning I noticed the
headlight bar was aluminum, so I took out the steel wool and began to
remove the paint and polished it. Looks like chrome, very pleased with
it. If someone would like to know the tools I use for polishing stainless
and chrome along with the compounds let me know. This week coming will be
refitting the doors, the bottom door hinge pins have a little play
in them. I need to raise the back of the door to keep it from hitting the
body. Should be an easy hour fix. Does anyone know which door hinges
might interchange. They look close to VW.
The next significant change will be dual exhaust, and then dropped
spindles. The front sits just a little two high. I am thinking about a 2
or 3 inch drop. Should be able to order dropped spindles from the net.
9/13/04
In answer to a question about radiator fit on a '78 Glassic:
Water pumps Most of the older 302's had the water exit the pump on the
drivers side. In about mid seventies they changed that. While taking my
pump into the parts store the clerk punched up a 74 pick-up 302 water
pump, he brought it out and the water exit was on drivers side. He then
punched in 69 mustang 302 and the water pump came out being correct. I do
think that each of these will bolt on to any 302 from the 60's to 70's.
Another thing is that when they went to serpentine belts Ford reversed
the direction of the water pump. The water exit is still on the
passenger side and will bolt onto the older motors but if not installed
with the serpertine system they will pump water backwards. (My friend
made that mistake on his 289, he purchased a NOS water pump at the swap
meet and installed it on his 29 roadester he did not know it was the
serpertine pump).
Now back to the radiator shell, I think I doubt my friends body
shop installing the 28 shell unless they modified the hood. Over the week
end I placed the Glassic shell back to back against my 29 shell. While
all the measurements seemed exact the difference was at the curves from
the top coming down the sides. I think the 29 started the curve much
later and would require reshaping of the hood. Now just maybe the hood
latches would pull it down just the few inches needed to fill in the gap
between the two.
Tonight I am going to put back to back a 32 shell and the Glassic.
I think the top curves of the 31 and 32 are identical. (I have a 32
fiberglass shell in the box for my friends 29 and I can compare them. I
do not have a 31 shell off the car but do have a 31 hood off the car and
may just try to see how close it is. Without a doubt the 31 shell would
have to have about 4 inches removed to fit. I will try to get digital pixs of all of these back to back for your website.
Followup: RADIATOR SHELLS
last nite I compared the 32 shell, the 28-29 shell, and 30-31 shell.
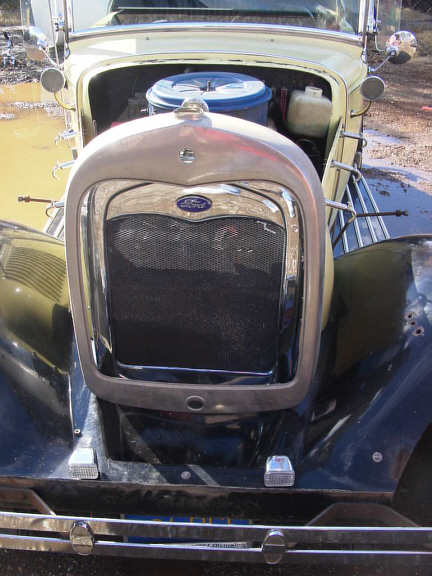
The Glassic is a combination of the 28-29 and the 31. The height is
almost identical to the 28-29 and the width is almost identical to the
28-29. However, the top shape curve is identical to the 31. I removed my
hood from my original 31 coupe, (it was easier to remove the hood that the
shell).
I laid the Glassic on the 31, the curve of the top piece of Glassic fit
the curves of the 31 shell perfect. Also the curves of the Glassic fit
the body nearly perfect. The Glassic top hood piece is about 3 inches
longer than the stock steel coupe hood. The way they got the hood longer
without changing the wheel base is by moving the radiator forward. On the
original 31's the radiator is sitting directly above the front axle. On
the Glassic the radiator is about 3-4 (maybe more) inches forward of the
axle. This also how they got more leg room for the passengers.
However, the Glassic shell is a little wider than the 31, and the 31 is
about 4 inches taller than the Glassic. I do think that if a person
installed a 31 shell onto a Glassic that the sides of the shell would
spread out just enough to be bolted onto the Glassic. In visually looking
at this I think a person would have to provide a little more strength to
the sides of the radiator supports in order to make sure the steel shell
remains wide enough. Since the original Glassic shell is what provides
shape for the side hood sections a person would need to make sure that the
shell is stable in the position you need before mounting the sides.
The only problem I see here in using the 31 shell is deciding where to cut
the side out to shorten the height. It would seem to make sense to cut it
out of the sides right at the bottom of the shell just before the sides
would touch the fenders. Then the bottom could be installed first with
part of the sides point up, then the top section of shell would slide over
the outside of the bottom piece and should pretty much hide the fact that
you chopped the shell. If a person purchased the expensive stainless
steel version then you could weld the two halves back together and polish
off the welds.
I do know that the companies that make the 32 fiberglass shells will make
them to fit a 28-29 or a 30-31 and they will also make them already
chopped for you. So a person could order a 32 shell for a 31 and tell
them to chop it a few inches, (they already have the molds to do this) and
you could probably get a bolt on 32 replacement for your Glassic.
Now for last minute up to dates.
Lowering the front end On Saturday morning I decided to change the front suspension, I
removed the front springs and took out two springs from the original six
springs. I reinstalled the 4 leaf spring on the frame. I also used new u
bolts and two inch lowering blocks and remounted the front axle. I knew
this was going to place the axle too close to the bottom radiator hose
exit. I raised the radiator about two inches and reattached it. I then
raised the motor about 3/4 of an inch by installing steel blocks between
the motor and top of the motor mount. This realigned the fan to keep it
from hitting the bottom of the hose exit. I am thinking about gettng a 13
inch flex fan, It will pull more air and also give me more clearance from
the bottom hose.
I also took off the E-78 original tires and rims. I replaced them with 15
inch chrome smoothies and baby moons. I mounted P 215 65 15's on the rims.
(actually I bought the entire set mounted at swap meet for 200.00 last
year just to have them knowing I would find a car for them someday).
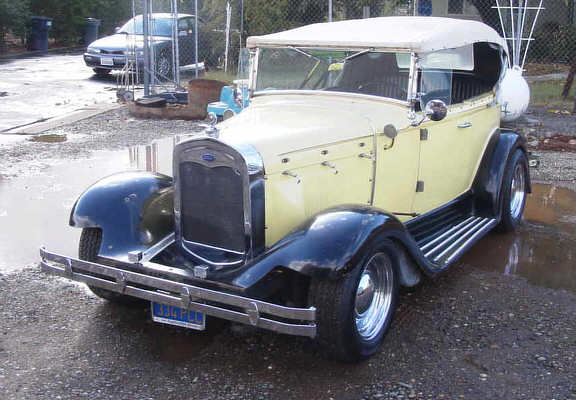 I removed the jack stands and lowered the car. This actually lowered
the front bumper about 4 inches. The front of car is now lower that
rear. and the tires fit up under the front fenders very nice. In all
aspects the front tires do not even come close to the fenders. I removed the jack stands and lowered the car. This actually lowered
the front bumper about 4 inches. The front of car is now lower that
rear. and the tires fit up under the front fenders very nice. In all
aspects the front tires do not even come close to the fenders.
I did create a little problem. The front axle is sitting about 1/4 inch
from the rubber bumpers mounted to frame. Since these bumpers are about
three inches in height I am going to remove about half of that to see how
it rides.
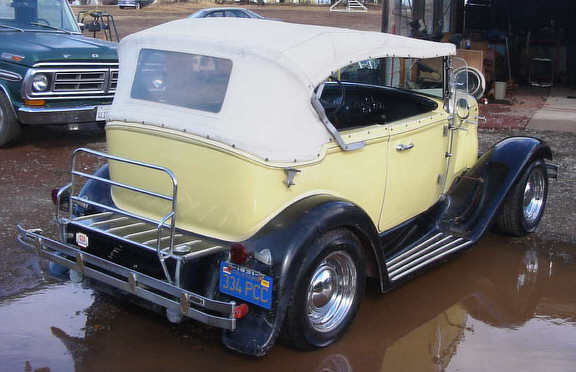 After all the changes I washed the car and headed to the car show for its
debut in the Sacramento area. The new radials did make the car track much
better than the biased plies. It did make it ride a little rougher
because any little dip would bottom out the front end. If removal of
rubber from stops does not provide enough travel then I am going to
replace the blocks with one inch blocks. Or I could reinstall one
spring. But I am going to opt for the block because I think the 4 springs
are very adequate for this vehicle and it should soften the ride just a
little. I think the 6 leaf springs were way more than was needed
on the original car. 4 springs with some good gas shocks should provide a
very comfortable ride.
The change in stance and the chrome smoothies with black wall tires have
changed the appearance very much of the vehicle.
By the way, total time for lowering the car raising the radiator
and raising the motor was about 6 hours including parts running. I bought
two sets of blocks and one set of u-bolts for total cost of $45.00.
(note, the spring mounting holes used by Glassic were about ½ of an inch
too narrow or you might say the blocks were about ½ inch two wide. That
is why I had to use the new u bolts. plus I had in hand a mounting plate
for below the spring that had wider holes to fit the u-bolts. If someone
does not have these then they would have to either make narrower lowering
blocks or obtain new lower plates for the shock to mount to.)
As for the problem on the 1978 regarding whether the bottom hose exits the
left or right of the radiator. Go to a good radiator shop (wholesale distributor for
radiators) They will let you look at pictures in the books. Or you can
change to water pump to the passenger side exit and then just
purchase a 3 or 4 row mustang radiator. It should be a bolt in change for
all of it. (Note: switching the water pump has not
yet been verified to fit - ed.)
9/15/04 "How to convert to one wire
alternator on 74 Glassic"
My original style alternator with firewall mounted regulator was not
working. I removed the old alternator, removed the black tape from the
wiring going from alternator to regulator, cut off all the extra wires and
only left the large wire that was connected to the battery terminal on the
old alternator. That wire runs from the alternator to the charging meter
on the dash and then runs back to the battery side of the solenoid. Since
no one in town had a Ford 'one wire alternator' and since I had in hand a
chrome Delco (Chevy) one wire alternator I decide to install the Chevy
alternator on the Ford. I drilled out the main mounting whole to accept
the larger Ford 8 inch bolt into the head. I use two 5/8 nuts to act as
additional spacers between the head and the alternator. Then installed
the new alternator. Now I have a newer style alternator with 100 amp
charging ability with a built in regulator. These one wire alternators
for both GM and Ford can be ordered from many of the advertisers in most
hot rod magazines. Many large car parts stores will carry them also. The
Ford one wire is more scarce since it has only been in the past year or so
(to my knowledge) that they are making them. The location of the mounting
hole and the belt tensioner hole are in the same location. the mounting
hole it at 12 o'clock, and the adjuster hole is at 6 o'clock.
9/16/04 Last night I removed
headlights and turn signals and headlight bar. The lights were
also from Lucas, I am going to replace them with king bee headlights from
vintique ($55.00 for pair chrome). The new chrome turn signals will be
moved to the front of the splash apron almost directly in front of the
headlights. The Glassic aluminum headlight bar will be wet sanded with
1000 grit sand paper and then buffed to a high polish. I also got out the
buffer for the radiator shell. I was afraid that the plastic shell
may not take to buffing very well. I was wrong, I used a cotton buffing
wheel and liquid chrome polish. (note: if it had been steel chrome I would
have first used a polishing compound, then went with final polish but did
not want to allow the compound to possibly scratch the shell). The shell
came up to a very satisfactory shine, much better than I had hoped for.
While doing the hood disassembly I noticed the metal finish
washers they use were eating into the fiberglass side panels some. I
went to home depot and purchase new zinc plated #8 finish washers (just
like the original used by Glassic) I then went to the plumbing section
and got some 1/4 inch faucet washers (rubber), this faucet washer
was the exact same size as the finish washer. These faucet washers will
be placed between the new finish washers and the fiberglass, this will
prevent further damage to the side hood panel. I will also use these same
faucet washers on the inside next to the body along with a flat washer.
The inside flat washer will spread the pressure our over more area that
just the small washer. I will use a nylon lock nut so the system will not
loosen up.
|
