|
|
|
|
|
I asked Bobby to elaborate on his gas-filler project: About the gas tank hookup, I bought a small filler neck that had a flange around it near the top. I cut a hole in the side of the car in the area that has the most space behind it and poked it through from the back side. I had to cut the filler neck 3 times and bend and re-weld it before I was finally able to get it turned in the opening so I could hook onto it. I then mounted the tank so that I could see what kind of bends I needed to make to connect the two. I then took a piece of pvc (plastic pipe, like used for sprinkler systems) and heated it with a propane torch so I could bend it into the shape I would need. This took 4 bends in a distance of about 2 feet so it wasn't an easy thing to replicate. After doing the best I could with the pvc I took it to a muffler shop and they copied it with steel pipe. When I tried to put it on the car I found that it was too long so I sawed it in two and shortened it and then put the whole thing together with 3 4" pieces of gas filler hose from Napa [had to buy a 3 foot section at about $40.00]. The gas tank has a vent that I hooked to the vent on the filler neck with water line hose. I found a large washer that would fit over the mouth of the filler and drilled holes thru it and the flange on the filler and put bolts thru the washer, fiberglass, and then the flange on the backside and then put nuts on and drew it all up tight. This process took a whole day to complete. Final placement of the new filler gets it off the rear platform, so it won't interfere with a trunk. |
 The car's original VIN tag is about the only thing that remained un-damaged. |
 Also since making the grill shell was so much fun I made a plug (mold) and made a dash that is a little larger than original so that I can incorporate a glove box. My wife cut out circles and squares for dash planning. (The paper pieces in the picture below are used as templates that can be moved about for best positioning before cutting holes in the finished dash) |
 The old dash sits on the floor. |
 Here are pictures of the car moving under its own power. It moves really well as I found out when I nailed it and ran thru a bush before I could stop it. March 19, 2007. First time old 838 has operated under its own power since
1977. |
 Not finished yet, but scroll to the top of this page to see if you can spot any improvements! |
 April, 2007. Car goes for an early McTestDrive -- transmission issues not need to be addressed. |
 The seats came out of a Silhouette van and although tall for the car the back ones can be locked down when not in use. At the Annexmaster's request for more details we got the following: The seats I got were from a 94 Sillouette I believe. This type of van has bucket seats in front and five more buckets in the rear. The rear seats are a little smaller than the front seats and fit the available space better than the fronts but they are made to be removable from the van and all the mounting system has to be cut off and some new mounts made that will let them set low enough to work in the Glassic. The front seat mounts also had to be modified quite a bit to get them to work. The bases are too wide and I had to shorten the outside support for each front seat so it could set on the wide threshold area which allowed me to get enough spread so they are not rubbing in the middle. These seats are vinyl but the center panels are of the perforated vinyl which looks good but probably is about as bad as cloth in rain. These were the only seats that I was able to find after four trips and many hours walking thru 2 large junk yards. Now as for your seat belt question, no the seat belts are not built in, they are all built into the walls of the minivan [shoulder/lap] except the center rear which was floor mounted. I used the front driver and passenger seats from the van in the same places in the Glassic. Although the back seats are a little narrower and could have worked better in the front the drivers seat is a power seat and I wanted that to help with moving to get into the back seat. The two back seats came from the rear of the vans 5 seats as they are all the same except for where the seatbelt catch bolts on. |
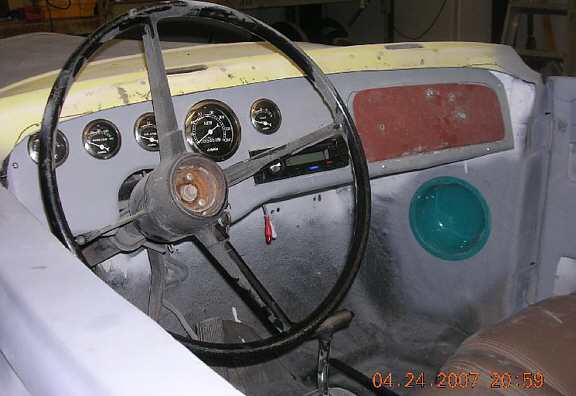 New dashboard coming along. The bowl in the kick panel is for a speaker enclosure. |
| more restoration to come! |


