| The Plan: I wanted some windows for
my Glassic. Since the car didn't have the soft windows
when I bought it, I decided to try for rigid windows of
some sort. In my case, I made these windows to go with my
homemade hardtop, but the technique should work ok with a
soft top as well. (with some modifications) I had seen this technique used by Bob, a guy who owned a VW Thing. His finished product looked very professional. These windows are designed to be quickly removed, and, (unlike the original curtains) built so that no work needs to be done to get in and out of the car. If you decide to build these, be sure that you have allowed a way for the window to be lifted straight up a couple of inches without hitting anything. In MY case, with my fiberglass top, the door has to be closed for there to be enough room to lift up. Cut a piece of cardboard and test the removal, installation procedure before putting holes in your door. With some thought, this procedure should work on soft - top cars. It is possible to have front and back windows, with the front window overlapping the back window. You aren't going to be able to lift UP on the back windows, so some other way of mounting THEM will be needed. |
|
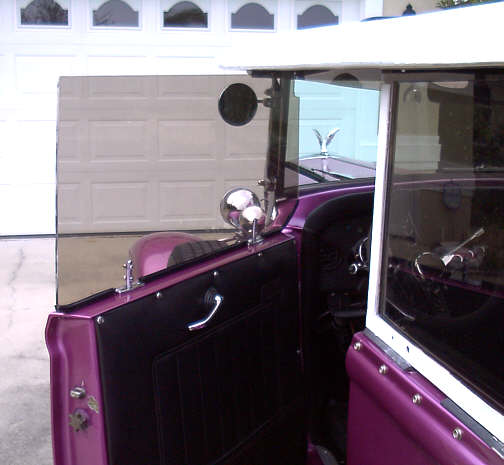
Oh, yeah. the yellow round thing is a plastic ball that I have dangling from the garage ceiling so that I can aim my rearview mirror and I can line up in the garage and not pull in too far. |
|
|
|
Here is the window popped partway out. The pokey pieces are just resting on the top of the oar lock devices. In THIS version, you HAVE to lift straight up to remove the windows. A different sytem would be needed for a soft top, where you can't lift straight up without removing the top. For example, you might take an L shaped angle and hook it to the two feet, and then wing-nut bolt the plastic along the bottom edge to the angle. |
1. A channel bolted to the top skirt to hold the top of the back window in place. 2. The two different bolts (shame on me) are holding the top skirt piece to the upright. 3. The window plastic is wedged on the inside of the upright channel. 4. The skirt above the door windows is hooked to the cross beam with an L bracket. 5. The dark strip is the overlap of the
skirt on the inside, and the door window on the outside. |
| In conclusion: This is a worthwhile project. I have
only tested it to 60 mph or so, and although noisy, it is
better than the hurricane of wind without windows.
Unfortunately, our two days of Florida winter are
probably over, so the cold weather benefits will have to
wait until next year. I got caught in a rain with only the front windows done, and can already tell that this will be a savior in a windy rainstorm. I am guessing the whole project cost to be about $150. |