|
A number of people, over the years, have successfully swapped a Chevy V8 small block and auto transmission into the Generation 1 (International Harvester based) Glassics. One such swap is car 187, with some details here posted in Nov. 2018.
The Annexmaster vaguely recalls that car 313 swapped in a V-8 and, I believe, the owner used a Universal motor mount as well, and had some issues with the engine sitting back and the distributor interfering with the firewall. He did not report the swap as particularly difficult. Some pics of car 313 |
|
|
In October, 2021, Ric the owner of car 267, generously shared the following project info: In 2020 I took out the International Harvester inline and 3 speed trans even though there were less than 19000 miles on it. I picked up a 1987 2.3 Ford Mustang with automatic. This past year I had custom engine mounts fabricated and installed the 2.3 Ford engine and auto transmission. I used the existing trans cross member but just moved it back since the automatic is longer. I used the Mustang drive shaft but cut it shorter and welded the International Harvester differential yoke to it. A trans cooler and electric fan was added to the the back side of the original International Harvester radiator. So there is no difference in the looks from the outside. No changes were made to the brakes. I removed the clutch cylinder and pedal. The cable speedometer was replaced with an analog looking GPS one than fit perfectly in the dash hole. The fiberglass bump plate in the floor was easily removed by drilling out the rivets and replaced with a 1/8 aluminum plate where I mounted an automatic shifter using the shifter cable from the Mustang. Im still working out some details with the temperature and oil pressure gauge. It now runs and shifts though the gears
with ease like a modern-ish automatic should. Additional info received from Ric in July, 2022 I have an update on my upgrades. The 1987 2.3 swap with a, intake, distributor from a Pinto, and HEI ignition module used on mini stock cars and a header from a ranger has this car starting and pouring like a kitten. The 4 speed automatic that was stock with the 2.3 mustang moves the car down the road wonderfully. I have all the gauges working as they should and the GPS speedometer seems to work fine. I have since found a set of true spoke
rims with 225 / 70 R 15 tires that look correct for the car. I nave fabricated radiator hoses utilizing the original radiator. The hoses are cobbled together with adapters that will likely fail sooner than later, so I am considering ordering a custom radiator. I have made no changes to the body or top as they are still original. I might consider selling the car as I do have too many. My email is richarry@cogeco.ca and I am happy to field questions about what I have done to the car.
|
|
|
Starting system - starter solenoid - 1973 Several issue have been causing car 689 to be unreliable and in 2012 and 2013 some steps have been taken to resolve them.
That heat may have meant that the spring which disengages the starting motor did not pop back or something. Or, just a bad second starter. After that the car worked fine - for a while. I had
recently replaced the coil, which seemed to smooth out the car engine,
then again, no start The next day, it cranked and cranked, but no hint of firing. Twice, just as I stopped cranking (let off the key) , there would be a small sound of one cylinder sparking. This led me to think that maybe the feature in a solenoid that makes it send higher voltage to the coil when starting up was not working. That, combined with occasional fails to crank at all, made the solenoid a suspect. NAPA ST81 by Echlin looked like my old one and had a 36 month warranty. This one was $25.49 plus tax, but they had a 12 month guarantee one for about $16. The "premium" one I got says "made in China" The clerk at NAPA asked if it was a car or truck and I guessed CAR, since who knows where the part came from in the Ford stable. He also wanted to be sure that there were 4 terminals, not 3. Turns out that a search of NAPA's website shows the same part for car or truck. I think these are kind of generic for the era and likely cover several years. I removed the battery to get access and took the old one off, cleaned the terminals and put the new one in its place. The 2 solenoid mounting bolts come from inside the passenger firewall, and a pair of vice grips or an assistant will help keep the bolts from spinning as you undo the nuts under the hood. I found out why you re-connect the POSITIVE post of the battery first. I connected the negative, then. when tightening the positive bolt, the wrench tapped that diagonal radiator brace which was grounded - big spark. By doing the positive first, then if you touch ground, no problem since the electricity can't yet get to the negative end of the battery. After replacing the solenoid, I noticed that the small connector (left front one below on the right picture) was loose and flopped around. Something had come undone inside causing it to wiggle, and likely not work right. With the new solenoid, the car started fine, except that it was likely flooded from my prior attempts, and the battery was partly discharged, so it took it a while to idle normally. The coming days will tell more. NOTE - Several internet sources suggest that whenever you replace the starter motor, you automatically replace the solenoid. I had not been advised to, nor did I when the two starters had been replaced on the carl.
***********************************
Spark plug firing order Ford 302 - While it is not usual for me to post stuff that is
easily found elsewhere on the internet
***********************************************************
Fuel line clogs up - In December, 2009, Elmer Mack shared the following:
....when I received my car last week from the seller, I had a hard
time starting it, and then keep it running after @ 1-2
minutes.........We used starting fluid and that partially helped, but
the engine died after 1-2 minutes of perfect running...
.......The problem was a small rubber hose/gasoline line coming out of the fuel tank was old/weak/rotten and it was collapsing when the fuel pump sucked the gas out of it. Once this rubber gas hose was replaced the car ran like a top...........You may want to post this info.. This should serve as a reminder -- ANY rubber parts are subject to deterioration over time and, if they have not already been replaced on your car, they should be -- rubber brake lines, fuel line, hoses, belts -- and TIRES! While these items may look ok on the outside, if they are old, they go bad on the inside. sludge in gas tank In August, 2010, I got this info from Ross, car 329 Do you know of anyone that has had problems with their fiberglass gas tanks? Here's what has happened to my Roadster: It began starting hard and skipping badly and I thought it was an electrical problem. All electrical components were replaced and still the problem was not resolved. The repair shop said it needed a valve job and new push rods. The valves were sticking because the gas tank was deteriorated inside and sending some kind of gunk with the fuel into the engine. You could actually scrape gunk off the bottom of the tank. It's being repaired now and I was wondering if this has been a problem for anyone else.
ANNEXMASTER REPLY:
As for the gas sludge problem, I have not heard of it with Glassics any more than the general issue of gas getting all cruddy over the years that many collector cars sit around. Some Glassic owners have reported the problem, not so much about the gas tanks but the old gas. Several have had their gas tank "cleaned" and coated with some stuff -- just an item that they mention when describing their cars.
I had not heard of the gunk requiring engine work (there are magic
chemical products at the car stores to clean sludge from engine parts)
but have heard of it clogging up the gas lines and so forth.
Replacement reproduction gas tanks should be available for most
years of Glassics if you want to go that route, or, I think, radiator
shops will clean and "coat them".
So, in summary, I have not heard of any issues tied to fiberglass
or plastic tanks, but have heard of rust and sludge both in Glassics
,and other cars that are old and have sat around a lot.
Please let me know how you end up solving the problem so I can post
your solution.
And Ross' solution: I ended up having a valve job and a new gas tank installed. The valves were way beyond just using a gas additive. The mechanic showed me the problem and how hard it was to free up the old valves. Also, the gas tank was so badly coated with gunk on the bottom you could scrape it off with a screwdriver, much of which was ending up in the engine, causing the problem. All is fine now and my "Toy" runs like a top. PS -- you can Google ANY
questions - there are articles and videos
1967 ignition parts fit a 1971 Ponce, car #432 reported in May, 2008: .....I went to two parts places (one is NAPA) for cap, points, rotor and condenser. The points and cap match up to a '67 engine. I had them look at '71 and they weren't even close. Here are parts that worked in car 432: For reference, the numbers on his engine are:
NAPA part numbers :
This is reported in the spirit of sharing clues. It is unclear how 1967 parts would be in a 1971, but here is his experience in case it is helpful. The Annexmaster saw an early Glassic with a TOYOTA drive train, installed by a junk yard owner - so anything is possible in a Glassic after all these years.
Spark plugs for my 1973 (car 689) SUGGESTION: TAKE AN OLD PLUG WITH YOU TO THE STORE.
Seemed like an easy project in
2012. So I went to O'Reilley Auto Parts in Southern California and
specified a 1973 Ford 302. What he gave me was not right for my car. While they replaced them, it is still unclear how I came to get the wrong plugs, but it does happen. The computer still said that (WRONG PLUGS) Motorcraft SP502 ASF42P was right. As it turned out these plugs were the right look, and length of neck, but much smaller in diameter thread than what I have in the car. When
I removed the car's plugs they were Autolite 45. From eBay ads, I
think that my Autolites are 18 mm threads, where the Motorcraft are I am no mechanic, but I kind of think that these two plugs are not REALLY interchangeable. Of course, I now question WHAT engine is in my car, and believe that when I tried once before to read the stamping on the engine, it was hidden under the starter motor, but I will try again to find it. My mechanic suggested that perhaps the heads had been changed sometime over the years or did not match the engine for some reason - I THINK he said that the smaller plugs probably would have been correct for that year. A further check on the internet suggests that Ford does not want you to know the serial number. It appears that the starter motor has to be removed to find it. I will pass on that since my THIRD starter seems to be doing fine for now. Apparently, a new or rebuilt starter can OFTEN fail right away. ****************************************
A mechanic's advice for car
678, a 1973
April 2012 Repairs, suggestions by Bill. Bill, who had worked on the car previously at a dealer came to the house to look at the running condition of the car. Bill is a long-time mechanic, specializing in 1960's Mustangs. He checked the choke position, (by removing the air cleaner and confirming that the choke valve was mostly closed and later opened up as the car warmed up) He noticed some gas on the butterflies down inside the carb. There should not have been any there when cold. He looked at the spark plugs that I had removed. They all looked healthy. Emission part removed: Dash Pot He checked the operation of the car when cold, and did some adjustment of the carb. The throttle solenoid dash pot?? seemed not to be working right and was out of adjustment. (item # 3 in the photo above) He said that it served no purpose OTHER than emission control and it could be removed. It served to slow the accelerator feed down gradually when taking foot off the gas burning the gas more efficiently as the engine slowed down. He removed it and taped off the wire that fed electric to it. (see the arrow at item # 3 the photo above) While I was at it, I asked about the hose line at the front of the carb, that had no hose connected to it. He said it was to vent off gas fumes from the carb, and would have been vented to the charcoal filter canister - part of the emissions stuff - I don't think that vent exists on older carbs. Leave it to vent to the atmosphere. (item # 1 in the photo above) Timing Advanced He checked the timing with a meter, and it looked OK, After a test drive in which we agreed that the car ran alright but not inspiring, he ended up fine tuning by ear with the goal of advancing the timing some. After that the car was a LOT more responsive and snapped when floored. It felt about 50% more powerful than before. The car would skip and miss every few seconds at idle and in drive, and Bill suspected arcing or shorting in a spark plug wire. He got a shock from a spark plug wire, something that should not happen, and suggested new wires. He said at least 8 mm or even bigger wires would be good, and recommended MSD wires straight ends on them the cut it yourself type would be neater looking than a stock set. He said that a good way to test for shorts in the spark plug wires was to inspect the car in the dark. I did that and saw light at most, if not all spark plug boots, as well as at spots along a few of the wires every now and then. Internet sites suggest a dielectric grease, which the web says:
Fuel Filter Checked He also removed and checked the fuel filter. (item # 2 in the photo above) He was thinking that the carb was adequate, but may have some clogging issues causing un-smooth running at a certain rpm range. He un-wrenched the filter after removing the hose clamp, and placing a rag underneath to catch dripping (or squirting in my case) gas. He tapped the piece to see if any gunk came out. Very little did, but it looked easy to just replace. He suggested either SEA FOAM, a gas additive that had worked. Otherwise, he was not that hot on changing to a 4 barrel (unless racing) and suggested a new Holley two barrel as an alternative. He also suggested a Petronix electronic pointless ignition setup along with their own coil. He said that they were more reliable and better technology, and fit inside the old distributor cap. He said they were easy to install. Bill also commented that my readings of the cylinder pressure were likely off, and that the engine sounded good overall. When I changed my plugs, I tried to test the compression with an old compression tester that I had found at a yard sale. One cylinder read 50 pounds, where the rest were all over 100 pounds or so. I do not know if the gauge was accurate. The occasional sputter when stopped could be arcing of the spark plug wires, the roughness (not seen during the road test) at mid range could be carb being short-changed on gas from gunk or corroded jets. Brake fluid was leaking and should be replaced since I mentioned rust around the lip of the master cylinder. Adjusted carb Removed solenoid (dash pot?) Adjusted timing (advanced it) Checked the old plugs. Test drove twice PRODUCTS SUGGESTED - Petronix igniter breakerless ignition (igniter II not needed) with their recommended coil Not too expensive, improves performance, easy to install inside the old distributor cap Holley 2 barrel should provide plenty of fuel. New recommended over rebuilt. 4 barrel carbs, even as low as 600 cubic feet per min. can provide too much gas. Sea Foam has had good results in cleaning gook out of carb, valves, etc. Not cheap, but is added to gasoline. It won't repair worn parts or corrosion, however. FROM the internet: Dielectric grease lubricant for spark plug terminals. Loctite makes one as do others. Followup: I put this stuff ($3.00 at Walmart) on the spark plug ends and re-inspected the plugs at night. There was still plenty of light at the plug boots, so it did NOT fix that problem. I ordered 8.5 mm plug wires on ebay ($45 + $10 for shipping) and will report back on what effect THEY have.
|
|
|
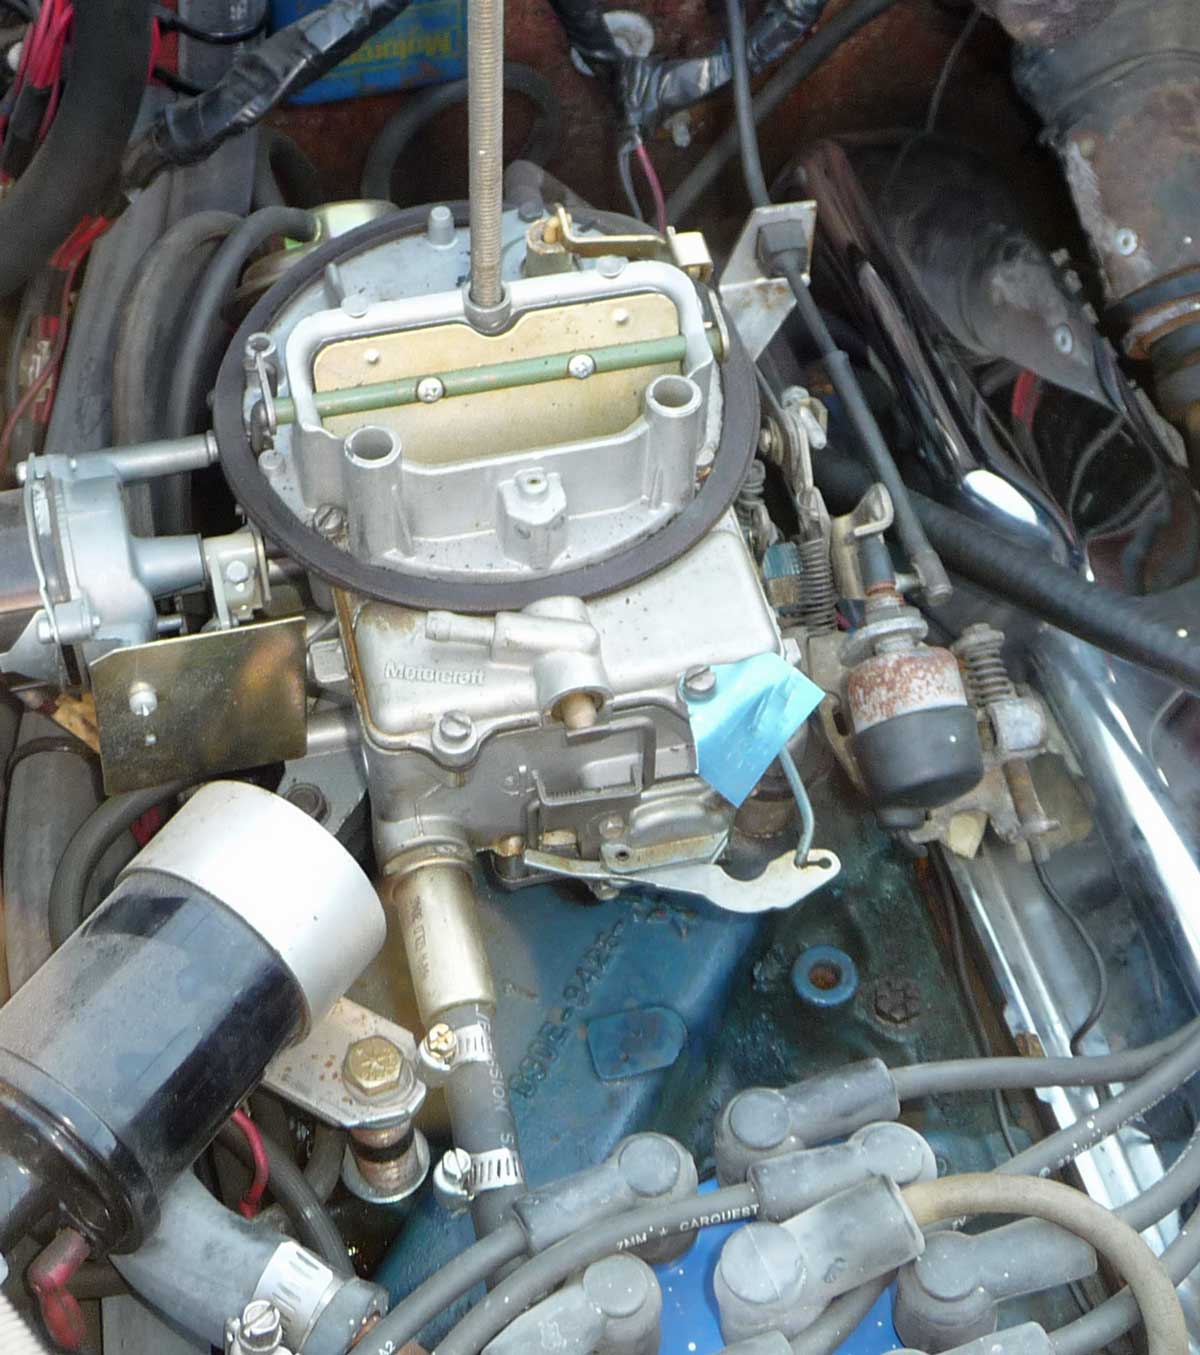
Leaky carb on my 1973 The Annexmaster's unrestored 1973 - car 689, was leaking a lot of gas from the carb to the engine block. Those of you who know this website know that my mechanical know-how is pretty bad, but I was able to figure out enough to stop the leak. The gas seemed to be coming from what turned out to be the accelerator pump (I don't know what that is, or what it does), and research on the web suggested that the diaphragm inside that item often went bad.
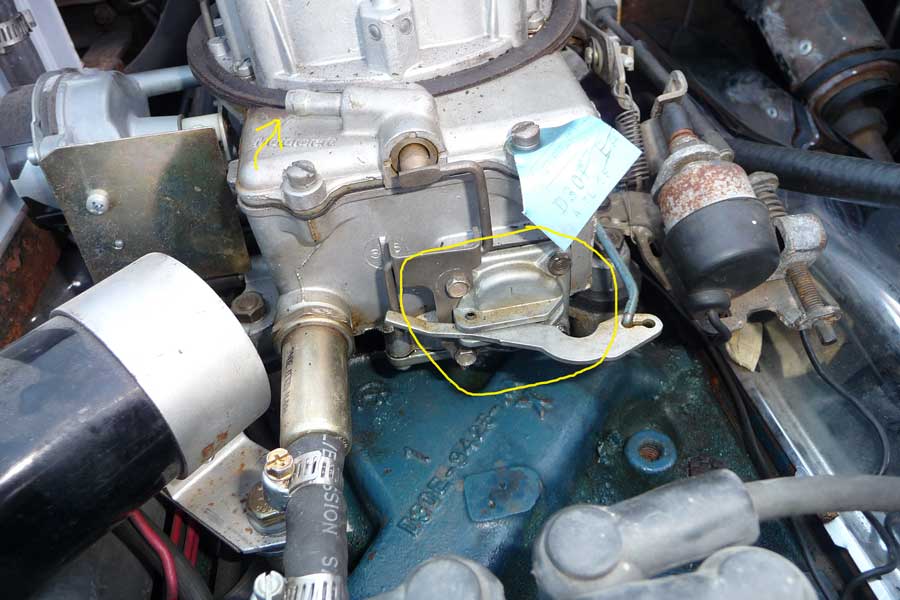
The accelerator pump is the item in the front of the carb, held on with 4 small bolts.
The yellow arrow shows that there is a vacuum line that is supposed to operate that pump, and in my case it is connected to nothing. I am guessing that when there is a pull on the engine during heavy acceleration, that pump adds extra gas to the carb. The circled item is the accelerator pump. You can see 3 of the 4 bolts that hold the cover on. -- behind that cover is a square gasket, with a round metal plate floating on a rubber bladder. My od one did not appear to have any hole or tear, but replacing it sure stopped the leak. I went to the local NAPA store and they acted like they had a replacement diaphragm part, but I did not pursue the purchase then. The next day I looked on-line and found the following info. The carb is likely a Motorcraft 2100. The metal tag on my car, above the accelerator pump says Motrocraft D30F EA, and the next line says A 2L 28. The D is for 1970 to 1980, the 3 after the D is for the year 3, as in 73. The 0F and EA, I think are specific carb configurations. When I went to another parts store, they asked what type of car -- together we guessed F-100 since, the guy said that was what vehicle likely had a 2 barrel carb. This store did not have a diaphragm part, but had a whole carb re-build kit. Since the kit was $13 I got it. This "Fuel system repair kit" said Fuel injection, which of course our cars are not. BUT, turn the box over and it says Carburetion. This kit seems to be a one-size fits all. The kit is full of mostly gaskets and two instruction sheets -- one of which was for the 2100 carb. Since I did not want at all to take the carb off the car, the idea of a re-build was out of the question. So I decided to try to just replace the diaphragm and see what happened. There is also a check valve that should be replaced, but the instructions for that seemed a bit more that I wanted to fool with. I figured I could do that later on if necessary. PARTS NUMBERS The Ford truck enthusiasts website provided this info, which I did not end up using, but which should be valid: D4AZ-9A586-A carb overhaul kit. -- fits all 62-74 2100 series 2 barrel carbs or, just get the parts
you want -- C4AZ-98559-A pump diaphragm (Motorcraft CM-463) As it turned out, I only used the one part, the diaphragm, from the overhaul kit, and the leak stopped so I am happy. The Ford Truck site also warned that there is a spring behind those 4 bolts, so when you remove the cover, watch out, or the spring will pop out onto the floor. The arm connected to the cover on the left upper corner of the yellow, is spring loaded also and that spring has to be put back behind the arm when replacing the cover. Before taking the cover off, you can see how the vacuum (if it is connected to anything) will pull the plunger in, which moves the spring loaded arm, etc. The leg of the spring reaches behind the lower arm to keep tension on the whole thing. That little spring is hidden behind the upper left corner of the yellow outlined box in the picture above. This is not mechanic quality info, but does show that even a rookie might be able to stop a leak. ______________________________________________
Gas tank not filling completely
The tank is vented. A rubber hose connects to the Gas
Tank above and to the front of the Fill Line. The other end of the
Vent connects to the Fill Line just inside the Gas Cap end. You can
feel that end of the connector by removing the gas cap and inserting
finger down and toward the front.
The Rubber Vent Line was Crimped on car 918 in
about the middle causing the Gas Tank to stop filling at about 8 or 9
gallons.
Attached is a picture showing the Gas Tank end of the
Vent Line.
The yellow line represents roughly
the side profile of the gas tank. Car front to the right.
|
|
|
Dual Exhaust setup added to a 1978 In March, 2009, John, car 1254 reported:
|
|
|
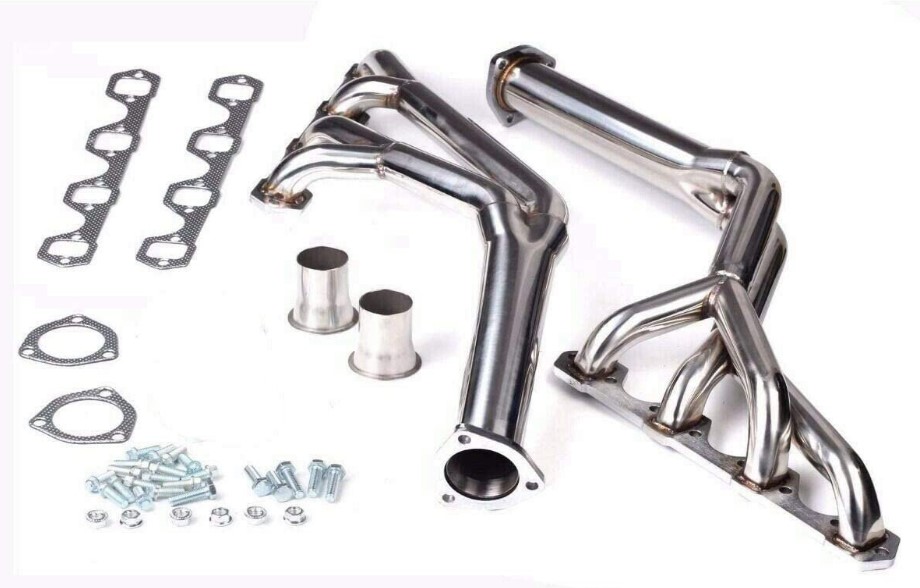
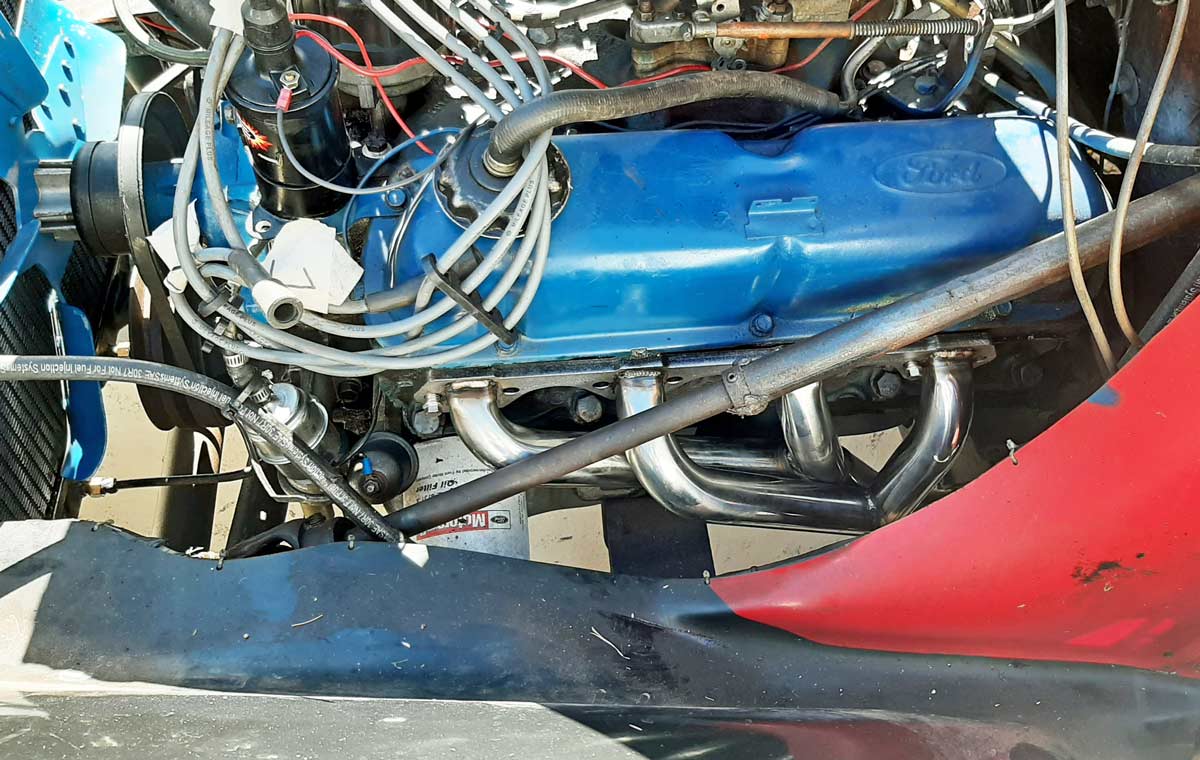
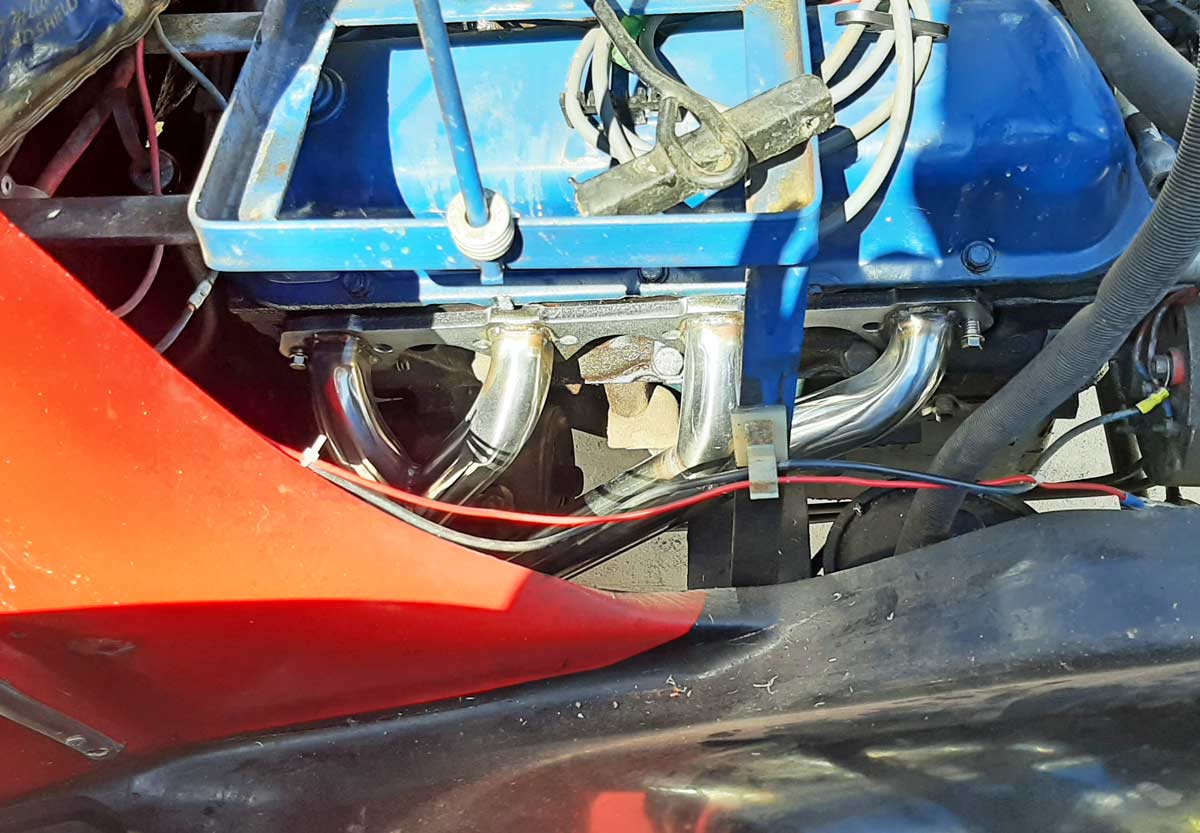
Dual Exhaust added to a 1975 In March, 2021, Bryan, car 1023 reported: I needed to do exhaust work since the muffler and tailpipe were rusted through, and decided to upgrade the exhaust system at that time. Obviously you cannot go to any auto parts store to buy Glassic parts, so I had to wing it. I found a set of stainless steel tri Y headers for a 65-70 (possibly 1964-70) Mustang and was a perfect fit. Easy installation. Only issue was the reducers come out about 4 inches before the trans crossmember, but some flex pipe fixed that. Then turbo mufflers and tailpipes from a local Autozone. Headers from Amazon, complete with bolts and gaskets, around $90. - Why is some of this in PURPLE? By March, 2021, I could not find headers on Amazon at that price - here is a picture of one for $102.97.
|
|
|
Radiator leaks - yes, multiple times! This piece also could refer to heater core leaks and likely could apply to any year Glassic or Replicar In November, 2013, I got an email from Larry, car 912 who wanted to share yet another odd-ball thing that happens to Glassics. His email explains what happened.
This sounded so unlikely that I pressed Larry for more particulars, and looked on the internet to see if there was any merit to this diagnosis, or if Larry was the victim of a radiator salesman. Here is Larry's additional info:
A Google search revealed that there IS such a thing, and, in the first article that I found, the problem was addressed as an issue for leaking heater cores (the little radiator-like grills inside the heater box, where hot radiator water has a fan blow over the coils to make hot air for the heaters.) Like radiators, these are prone to leaking, and often repaired by radiator shops. Rather than put links here, that may be gone in time, you can search using words such as radiator leaks bad ground or radiator electrolysis to learn more.
YET ANOTHER
REMINDER, THAT, AS FIBERGLASS CARS, |