|
The AFTER picture: New location of filler, with the elaborate trunk
moving feature in use and the old hole where the filler used to be.
There were zero leaks after the change, BUT, the tank had to be filled slowly or the gas pump would click off. Since the hose at the filler end is the same as the original Jeep filler, it is likely that the bends in the larger hoses caused gas to back up and make the nozzle think that the tank was full. As I recall, I never filled the tank full-blast even before the filler relocation. The project was mostly successful. In 2014 I thought I would share some photos and observations about my fuel filler pipe and setup. I do not like the placement of the filler since it interferes with my trunk location. So far, I have not seen a substitute filler pipe, although I feel like I have seen a filler on an old pickup truck that is a neck, with a cap at the end that goes out of the side of the truck at a 45 degree angle upward, and, with luck, has a vertical mounting plate that could mount on the SIDE of the rear bump out, (further checking shows the FRAME of the car right where that would go) with a piece of pipe continuing downward so a hose could be hooked on to connect to the tank. I have not seen anything like this on eBay yet, so meantime here are some photos of the original setup for use as a reference. Other words that might be used by viewers to search for this page -- Gas filler, gas filler neck, fuel filler neck, fuel cap, gas cap. Replicars, the later Glassics have the filler on the fender, out of the way of the trunk platform. -- see pics below This link is to my personal favorite, the McWreck, and his relocation of his filler tube http://www.glassicannex.org/838b/838b.htm -- his solution seemed way too hard for me, and I hope to find some off-the-shelf parts to do this conversion. So far, the problem is that most parts do not show measurements, since usually people just want a replacement for an existing make and model car. one criteria for my change is that others will be able to buy the same parts if they also hate the location of their filler. |

 above left: green is present location, red are possible alternatives. above right: existing goes a bit to the rear of car, and then up to deck platform. 2 -- 90 degree hoses. |
|
The 3 blemishes near the large hose clamp in the upper
center of the pic (toward the ground in real-life) are dry rot cracks
and could explain why |
|
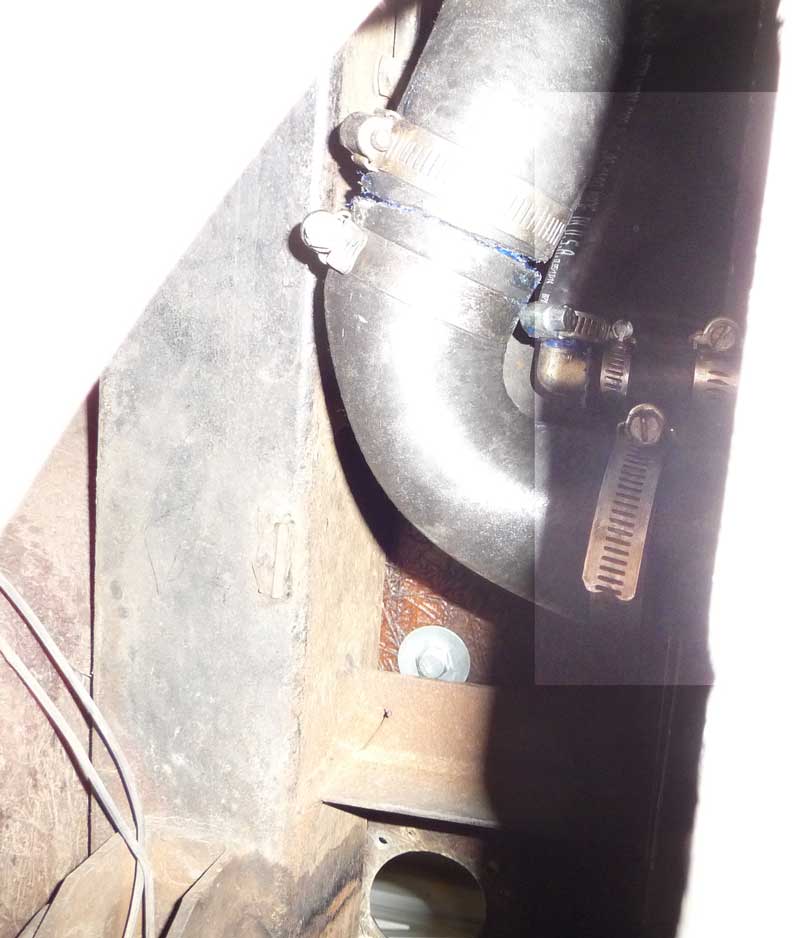
car 689 Here is the other end of the breather hose where it
enters the gas tank (#1). The plug at #2 enters the filler
tube near the gas cap, and is on the opposite ADDED LATER - location 1, the fuel line is
1 3/4 inside diameter at the neck. I got calipers past the end of
the rubber elbow.
The beam along the top means that the turn has to be less than 6 inches,
or more than 9 inches to go up either inside |
|
car 689 This view, looking upward, shows what I think is
another vent line, a pipe that runs from above This, I suspect, is to replace air as gas is sucked out of the gas tank by the fuel pump. |
|
Many filler tubes for other cars as seen on eBay seem to have that secondary pipe or connection for air release. |
|
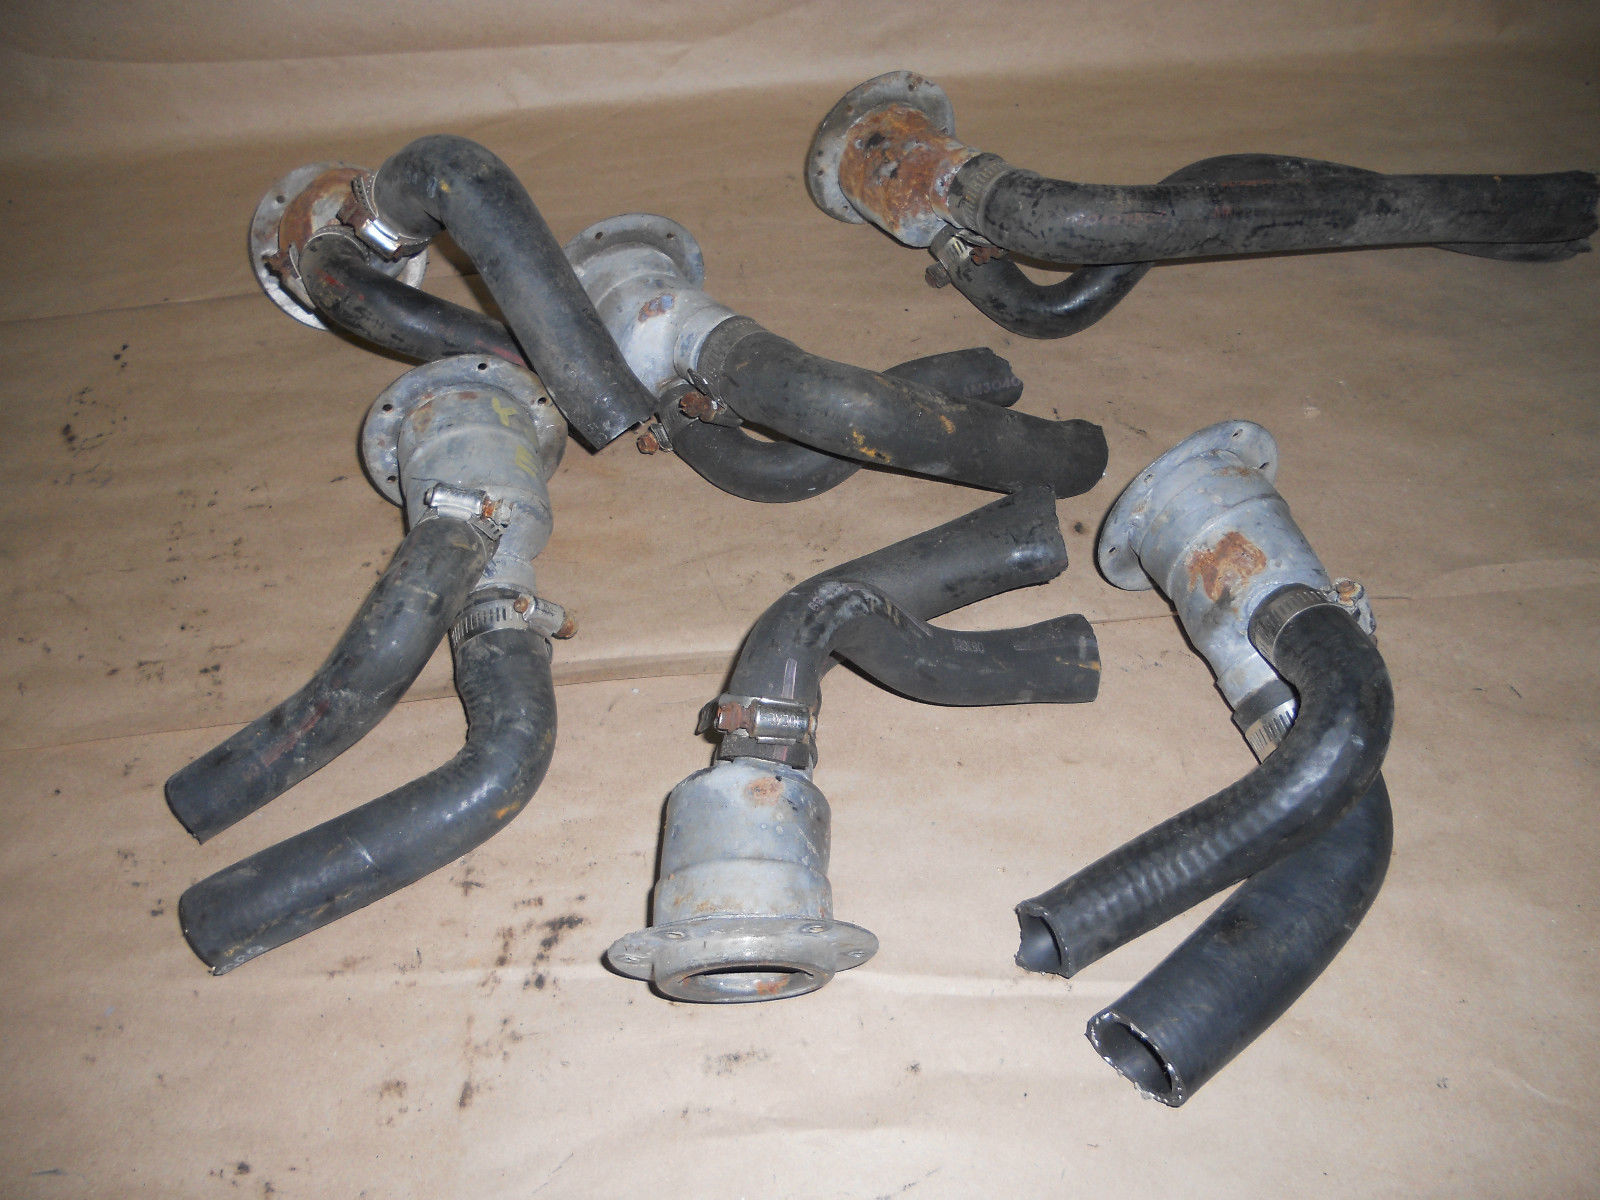
Replicars hose replacement Around the same time as my project on car 689, David replaced his hoses on his Replicar # 1458. Some of his tips match what I was discovering with my car. His tank end is 1 3/4 inch ID the same as mine, but his fender mounted filler end was 2 1/4, so he had to reduce sizes to meet the two. He got a two inch tailpipe joint at a local part supply place (O'Reillys) http://www.oreillyauto.com/site/c/home.oap - and took it to a muffler shop and had them stretch one end to 2 1/4 inches. Then another similar exhaust adapter to go from two inches to 1 3/4 inches. He used a 90 degree 2 1/4 inch hose from Gates, and a 45 degree bend hose to connect these. He said straight hose wanted to kink if you bent it too much. VENT - he said 5/8 inch hose - is this OUTSIDE measurement? but he used gas vent hose fittings to add necessary angles in the vent hose. He said the fittings were plastic-looking but rated for has hose vent use. He said they were Gates brand and he got them from O'Reillys. He reported success and no leaks so far. The Replicars have the filler on the back fender - a better location. Here are some views of car 1458 in 2014. A special thanks to David, the owner, for taking these reference pics to share. |


Picture
# 1 -view under the fender with
vent hose attachment the dark at upper middle of pic is the space
between the inner and outer "tub"-
Picture # 3 --metal elbow and crimped
(not in a good way) rubber hose heading toward gas tank the two clamps
right seem to be a reducer
Picture # 5 -- just below the fender
note the big nut and washer upper left corner of picture holding the VW
taillight also the large cutout of fiberglass for the VW light |
|
Jeep Wrangler YJ 91 to 95 looks like the one below as well.
A check of a Jeep forum says that the YJ is shorter than the CJ filler -
easier to make bend toward rear of the car - and has different
mounting holes (not important if you are putting the filler in a new
opening) Jeep CJ5, CJ7 and 1981 CJ8
78 to 86 says "1 inch inlet" don't know if other YJ has a wider inlet. Picture below
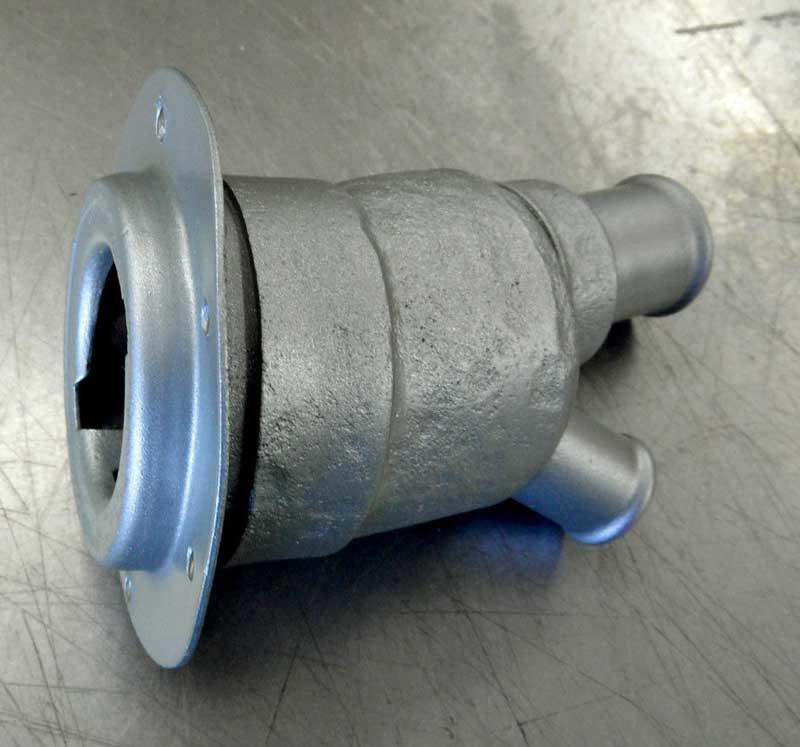
The above pics show the hoses attached, but mine has a widened end on the larger hose, suggesting the above were cut off the car, not complete. The correct way to do this would have been to buy a pair of new hoses to fit the Jeep. 10/15/14 - the part I ordered from eBay said that it came from a 1990 YJ, but the listing claimed that it fit 1987 to 1995 YJ - suggesting that I will get one with the ear type cap - which I did - , not the screw type, but the hose connections should be the same for any year. 10/23/14 - I got the part and it seems ok. In looking at the part and the hoses, I am now going to try to see if the center red dot (at the top left of the page) will be better. To do that, I have ordered a Jeep housing part 11135.25, that recesses the neck into the upright and puts it at a 45 degree angle. It seems that in this way, IF IT FITS, the hose angles will make less turns and line up more readily. Nobody had this part, and the round indent is for different years, so it may or may not work with my filler. Here is a photo of the part I have ordered.
This part arrived and is nice, BUT WAY TOO LARGE FOR THE SPACE - AND THE CURVE OF THE BACK OF THE CAR MAKES IT NOT ABLE TO LIE FLAT ON THE CAR. IDEA DISCARDED. I am in the process of making an outside version of this part from a plumbing cap. The purpose is to gain some space behind the car surface, and add some downward slant to the filler to make the bends more gentle.
Right now, I am leaning toward doubling up the hose at the filler (leave an inch of the old hose, and mount a new hose OVER it using gasket goop (fuel resistant) and a clamp. This will get me from one inch to one and a quarter inches leaving the filler, and still 1 3/4 at the gas tank end. An exhaust adapter at 1 1/4 inches was a problem, see order below. I am nervous about this purchase since it is a very non-standard size and not a real choice of vendors. -- I ended up using the old Jeep hose which was 1/4 inch larger at the far end anyhow. Regular hose does not make good sharp bends (it is stiff and wants to kink) , so the 90 degrees in the original Jeep hose was necessary - |
|
A parts list. GAS LINE Gas filler neck -, Jeep YJ $30 - eBay used including postage, cap and hoses (cracks in hoses, but the end good for changing from 1" diameter to 1 1/4") Housing for Jeep TJ new - $22 incl, postage Plastic, Amazon Prime, Also available in shiny metal or black plastic. NOT USED 3 inch ABS black plumbing pipe cap to make filler housing. About $6.00 at Lowes Hose pieces - 90 degree 1 3/4" inside diameter to come off gas tank. new - ordered Gates hose # 24716 from Amazon Prime (includes postage) $18.00 + tax 1 3/4 90 degree generic hose - it was longer, (and fairly soft) and I cut down the ends on both angle pieces. Ordered a second 90 degree 1 3/4 inch piece like the first one, $18.00 since there are too many direction changes needed to avoid the cross brace which does not permit the gas tank end to go straight skyward - instead it has to go almost directly toward the front of the car - the second 90 will be to turn upward - also need a piece of tail pipe or a fitting to join the two 90 degree hoses. Got a 1 3/4 outside diameter joiner piece of tail pipe to join the two 90 degree pieces. $2.99 at Auto Zone. Exhaust adapter - to join two sizes together - new ordered from Muffler Monster.com part # 0012517506 1 1/4 to 1 3/4 OD adapter $9.66 plus $14.03 UPS ground ordered on 11/6/14 at 8:40 am Pacific time Total cost $23.69 (no other alternative sources found for this item) On 11/7 I got an email that the part had shipped - so far, so good on this non-standard item. The part arrived 11/13, on schedule, and looks heavy, cleanly made and oddly tiny for exhaust, but should work very well for its purpose. I ended up cutting a bit off each end to make it a shorter connector. Clamps Gas tank end, large connection, small connection, gas cap end -- I had clamps from the old gas filler, in varying conditions, as well as a drawer full. I added a set of assorted hose clamps to get small ones for the vent hose. About $4 from Oreily's Auto Parts Liquid gasket - gas resistant, 1 tube - got 2 oz of Permatex fuel resistant gasket dressing and sealant (tube says "compare to Hylomar Universal Blue" - $10 at Auto Zone - other options appeared available. It was sticky but added some lube for joining pieces while wet. VENT LINE NOTE - fitment - the half inch barbed fittings slip loosely into the half inch hose, but the hose is quite a tight fit over the metal nipple on the gas tank. Not all half inches are created equal. I think the hose clamps and liquid gasket will make all that gasoline proof. The metal reducer also slides without difficulty into both the 1 3/4 inch new hose and the 1 1/4 inch wider end of the gas filler hose that came with the Jeep filler. The old Glassic gas cap does not seem to fit the new Jeep filler end. Clamps - two larger, two smaller - from home junk bin. Bolts, rivets for gas cap end - from home parts bins. A can of paint to make the filler end plumbing cap match the car. I got primer too, but the web says in was not needed. I am not sure how the black ABS plastic will hold the paint over time. $8 at Oreily's. Total approximate materials cost: about $135 in parts (not including tools, blades etc. and the chrome filler housing not used) |
Find out if radiator hose will serve as gas filler -- ANSWER: According to Google sources, NO. While it will work for a short time, it is a poor substitute and dangerous. Gasoline rated hoses are, of course, more expensive. Even the vent hose was suggested to NOT be heater hose etc. Get over the fear of fooling around the gas tank with metal objects, like screwdrivers. With wife "manning" the fire extinguisher, I got the old hoses off. Had to cut both the vent and main hoses - they were dry, stiff, cracked and not moving. A slice at the connection freed them and I drilled out the rivets holding the filler end on the back deck. The tapered washer underneath the metal was rubber and also dried and broke apart on removal. My wife noticed that the price of this project is increasing daily and may well end up to be a surprise (unless you have worked on an old car before).
Using an ABS cap to make a protrusion for the filler head - right:
Tape placed at a tilted angle to mark a straight line to cut the cap at
an angle.
#1 - the hole cut in the back of the car. Faint pencil circle shows the outside of the plastic housing - smaller but elongated hole BARELY allows hoses to fit through with clamps on them. Narrower sides leaves room for two of the bolts to hold the filler end to the plastic and then through small holes in the body to hold it all in place on the car. #2 a piece of temporary sprinkler hose to use before drilling the car - to be sure there was room inside for the hose to bend. The plastic length was figured by making a hole in a piece of pegboard and mocking up the setup. #3 the old hose that came with the Jeep part. It was 1 inch at the filler, but widened to 1 1/4 at the other end - #4 the fitting to change sizes of hose.
Above New hoses in place. - second pic above: upper right aluminum rectangle with bolts - part of my fiberglass top holder-downer. Two small bolts near the blue tape are holding the gas filler and the plastic housing up against the car. Blue tape: was to mark the approx. location - I forgot to remove it.
Above - the gas tank end, looking up. Notice the old hole still in the deck at bottom center of picture. Blue stuff is sealer gook. I had not mentioned that the filler head was installed from the BACK of the ABS cap since putting it on the outside would not allow the housing itself to fit through the plastic cap. Right and left hand bolts go all the way into the car, top and bottom ones are just holding the filler to the plastic cap, and empty holes are because it was too hard to put a nut on the back of the housing. A pop rivet would do nicely on those.
The trunk remains moved over so I can fill the old hole - the filler barely clears the trunk when the trunk is put back and centered. There is the main car frame just below the end runner on the back deck so a straight shot from the tank (inside the beam) and the corner of the car which is outside the beam would have had to go right through the beam. I went up and then over just a little so that the filler is pretty much right ABOVE the beam. Worked OK at the gas station but had to fill the tank SLOWLY- I will practice more on future refills, but at my first fillup I was stopping to check for leaks - OFTEN. There were none. Contributions to this page are welcome GlassicAnnex@aol.com |

 l
l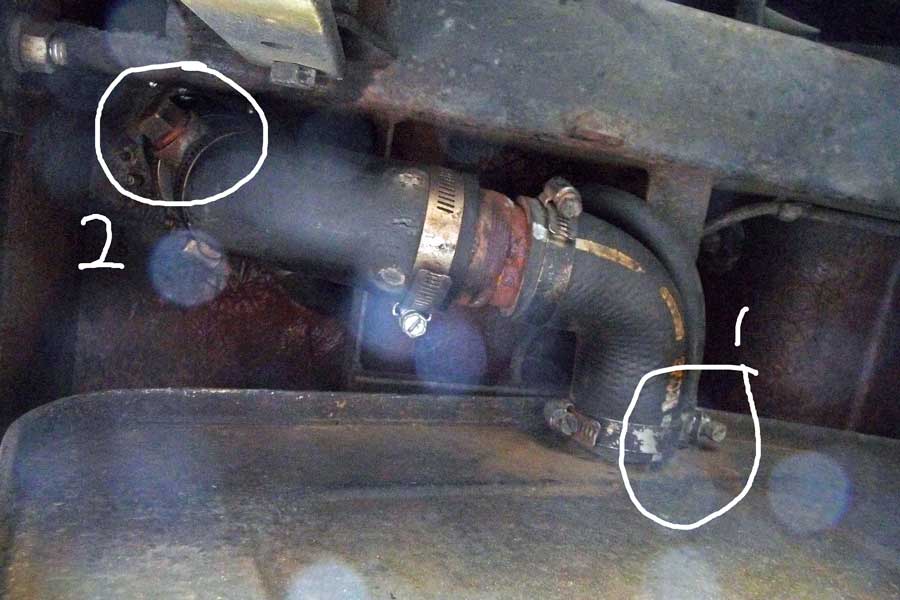


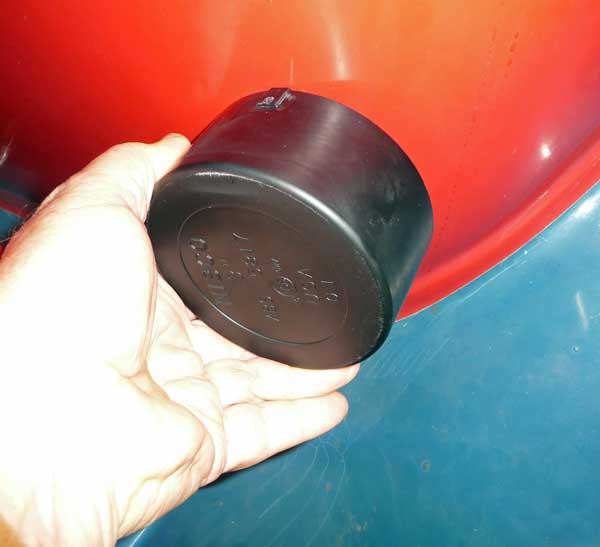
 This is
advertised as for a 1997 -2006 Jeep TJ and others and came to about $21
with Amazon 2-day shipping. It is not clear to me if this is strong
enough to hold the filler, or just a decorative cover, nor is it clear
if the neck will fit the surface. The hole configurations seems
different than the part that I bought, but if the parts match in size, I
can either use some of the holes, or drill different ones. The
issue is the mounting of the neck in the upper pictures matching the
holes in the cover.
This is
advertised as for a 1997 -2006 Jeep TJ and others and came to about $21
with Amazon 2-day shipping. It is not clear to me if this is strong
enough to hold the filler, or just a decorative cover, nor is it clear
if the neck will fit the surface. The hole configurations seems
different than the part that I bought, but if the parts match in size, I
can either use some of the holes, or drill different ones. The
issue is the mounting of the neck in the upper pictures matching the
holes in the cover.